


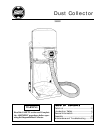


Dust Collector 330002
Page 8
Assembly
Assemble the Dust Collector according to the
following procedures. The numbers in paren-
theses are reference numbers listed in the
Parts List.
Tools Required:
! Medium and large Phillips screwdrivers
! Large bladed slot screwdriver
! Rubber mallet (or block of wood)
! Adjustable wrench, or 7/16" and 1/2"
wrenches
! 1/2" socket, ratchet wrench and short ex-
tension
! Pliers
Install the Legs
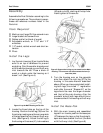
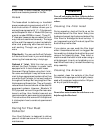
1. Lay the main housing (5) on its side. Make
sure it’s on top of cardboard to prevent
scratching. Point the smaller diameter end
with three clips toward you and the 3-way
inlet towards the left. Place a block of
wood or a book under the housing so it
doesn’t roll. (See Figure 4).
(42) and nuts (43), starting at the top hole.
Hand tighten all three nuts.
Figure 4: Lay the Main Housing on its side.
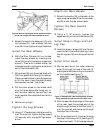
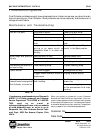
2. Locate the three holes on the top of the
housing. Position the left leg (39) over the
three holes, making sure the narrower side
of the leg faces the front toward the 3-way
inlet. (See Figure 5). Attach the left leg to
the housing with screws (41), lock washers
3. Turn the housing over on the opposite
side, then attach the right leg (37) to the
housing in the same manner described
above. When you have completed install-
ing both legs, the circled “r” registration
mark after the word “Shopsmith” on the
legs should be near the larger diameter
end (top) of the main housing. Also, the
narrower side of both legs should be on
the same side of the housing as the 3-way
inlet.
Install the Base Pan
4. With the main housing and assembled
legs still on its side, position the base pan
(47) between the legs, so that the straight,
open side faces toward the front (the side
with the 3-way inlet). (See Figure 6).
Figure 5: Support the left leg as you attach it to the Main
Housing. The narrower side faces toward the front (3-
hose inlet) side.