


Page 9
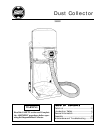
330002 Dust Collector
5. Attach the legs to the base pan (47) with
four screws (41), lock washers (42) and
nuts (43). Hand tighten all eight fasteners.
Install the Rear Wheels
6. With the Dust Collector still on its side,
install the rear wheels, by inserting a re-
tainer (44) into a 5/8. socket (or closed-end
wrench). Then with a rubber mallet, tap
the socket containing the retainer onto one
end of the wheel shaft (46).
7. Slip a wheel (45) onto the wheel shaft with
the three spoke side facing the retainer.
Place a suitable block under the base pan
or lift it by hand. Insert the shaft through
the base pan’s wheel ‘.haft holes.
8. Put the other wheel on the wheel shaft
with the three spoke side facing out. In-
stall the other retainer cap and tap it se-
curely against the wheel shaft end with a
mallet.
9. Set the unit upright.
Tighten the Leg Screws
10. Using a 1/2" socket and. ratchet wrench to
hold the nuts (43), tighten the leg screws
(41) securely with a large Phillips screw-
driver.
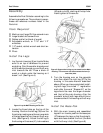
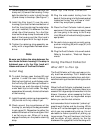
Figure 6: With the housing on its side, position the base
pan so the straight side faces towards the front.
Attach the Rear Handle
11. Attach the handle (33) to the back of the
legs, using cap screws (31) with lock wash-
ers (32) under the cap screw heads.
Tighten the Rear Handle
Screws
12. Using a 7/16" wrench, tighten the
capscrews (31) which hold the handle (33).
Install Snap-in Plugs and Left
Leg Cap
13. Insert the snap-in plugs (40) into the four
round holes in the side of each leg. Insert
the left leg cap (38) into the top of the left
leg.
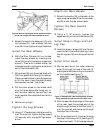
Install Filter Hood
14. Slip the bent tab of the metal retaining
strap (2) through the loop of the rack (3),
making sure that the writing on the rack is
on the outside (see Figure 7).
15. With the bent tab of the strap on the inside
of the rack; feed the pointed end of the
strap through the hem of the filter hood (1)
until the pointed end comes out through
the other slot in the hem.
16. Put the pointed end of the strap through
the loop in the clamp nut (4) (see Figure 7)
so there is at least 1/2" of the strap to bend.
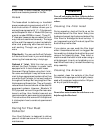
Figure 7: Assemble the hood retaining strap, rack and
clamp, and feed through the hem in the filter hood.