


12.
Operation
Risk of injury due to accidental
starting. Do not use in an area where
children may be present.
IMPORTANT: Prior to using the grinder, check that
the eye shields, spark deflectors, and tool rests are
fitted and correctly adjusted and that you are wearing
safety gear including eye, hearing and breathing
protection.
1. Turn the wheel by hand to make sure it does not
touch the guard, eye shields, spark deflectors or
tool rests and runs freely.
2. Stand to one side, turn the switch on and allow the
motor to reach full speed.
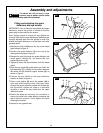
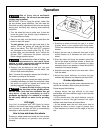
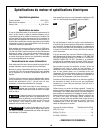
To start grinder: push the right hand side of the
switch. To turn the grinder off, push the left hand
side of the switch. The “ON” and “OFF” positions
are stamped on the switch plate (Fig. 8). If the
grinder does not immediately start, switch the
grinder “OFF”, disconnect the power cord and
check voltage at power source.
To reduce the risk of injury, no
adjustments to tool rests, spark
shields or other components should be made
while the grinder wheels are turning.
3. Support the workpiece on the tool rest and
gradually feed the workpiece onto the wheel. Use
pliers to hold small workpieces.
Note. Traverse the workpiece across the full width of
the wheel to prolong its flat surface.
4. If the grinding operation causes the motor speed to
noticeably decrease, pull back the workpiece, allow
the motor to regain full speed and restart the
grinding operation, but apply less force.
To reduce the risk of injury, only use
the front face of the grinding wheel,
not the sides. Note that the workpiece can get
very warm. It may be necessary to cool a
workpiece by dipping it in a coolant or in water.
Do not apply coolant or water to the grinding
wheel.
LED Light
Your tool is equipped with LED lights for better
visibility in the work area during operation. When the
tool is turned on, the light will turn on automatically
and stays on until the tool is turned off.
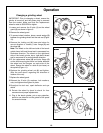
How to true and dress the wheels
Dressing a wheel cleans and levels the front surface
to increase efficiency of operation and prevent
vibration.
1. Dressing a wheel involves the use of a wheel
dresser which is not supplied with the grinder.
Follow the manufacturers instructions of the wheel
dresser.
2. Adjust the tool rest to allow the front part of the
wheel dresser to fit between the tool rest and
wheel.
3. Start the motor and move the dresser across the
front of the wheel a sufficient number of times until
the surface is level. It is not necessary to apply
excessive force in an attempt to dress the wheel in
one pass of the wheel dresser.
4. Adjust the tool rest so that it is no more than 1.5mm
from the wheel.
5. Adjust the spark deflector to ensure the gap
between the deflector and wheel is less than 6mm.
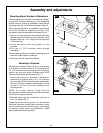
Grinder adjustments
During the life of the grinder some adjustments are
required to maintain a safe working environment.
Please ensure the following:
• Always adjust the eye shields to the most
comfortable and most effective angle to suit the task
being performed.
• As the wheels wear, the spark deflector must be
adjusted to ensure the gap between the spark
deflector and wheel does not exceed 6mm.
• As the wheels wear the tool rests must also be
adjusted so there in never a gap of greater than
1.5mm between the wheel and the edge of the tool
rest.
FIG. 8
WARNING
!
W
ARNING
!
WARNING
!