


13.
Operation
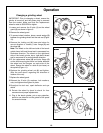
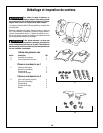
Changing a grinding wheel
IMPORTANT: Prior to changing a wheel, ensure the
grinder is turned off and the power plug is removed
from the socket. Make sure that the replacement
wheel is rated at 3500 RPM or higher.
1.Loosen and remove the 3 bolts
(1) on the wheel
guard (2), as shown in figure 9.
2.Remove the wheel guard.
3.To prevent wheel rotation, place a wood wedge
(3)
between the grinding wheel and the tool rest (Figure
10).
4.Remove the locking nut
(4) (see note below for
correct direction of rotation), outer flange
(5) and
the wheel
(6).
Note: The wheel on the left-hand side of the bench
grinder has a left-hand thread and is unscrewed in a
clockwise direction. The wheel on the right-hand
side of the bench grinder has a right-hand thread
and is unscrewed in an anti-clockwise direction.
5.Fit the replacement wheel
(6) and outer flange (5)
on the shaft ensuring that there is a blotter between
the wheel and the flanges on each side of the
wheel. Ensure the wheel is a slide fit (not loose) on
the spindle (Figure 11).
6.Replace the grinding wheel nut (4) and tighten.
(See the note above regarding the direction of
rotation of the nut).
7.Replace the wheel guard.
8.Reinsert the 3 bolts (1), washers, lock washers,
nuts, and tighten wheel guard in place.
9.Re-adjust the tool rest, spark deflector and eye
shield.
10. Rotate the wheel by hand to check for free
movement and proper adjustments.
11. Plug in the bench grinder, put on eye protection,
stand to one side and run the grinder at full speed
for several minutes.
FIG. 9
FIG. 10
FIG. 11
1
3
3
4
5
7
6
2