


65
Crown Molding Angled to Table
and Fence
• The advantage to cutting in this position is that no bevel
s
etting is required. Cutting is done with 45° miter angle.
• Crown molding of up to 4-1/2” maximum width can be cut
o
n your saw.
Crown molding stops should not be used
as horizontal clamps. Remove when your
not cutting nested crown.
Follow these instructions for cutting crown
molding angled to table and fence.
1. Position the molding so the bottom (part which is installed
against the wall) is against the fence. Make sure the
sliding fence is in place to provide maximum support (see
Sliding Fence for instructions).
NOTE: Crown Molding Support assists in holding crown
molding in place during the cutting operation. (See crown
molding support page 50
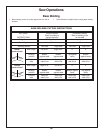
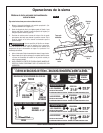
2. Set the miter angle using the chart below. Tighten the
miter lock knob (Figure 32).
Saw Operations
3. Activate the switch. Lower the head assembly and make
your cut.
4. Wait until blade comes to a complete stop before
returning head assembly to the raised position and/or
removing workpiece.
5. ALWAYS TAKE A TEST CUT USING SCRAP TO
CONFIRM CORRECT ANGLES.
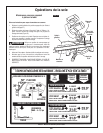
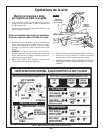
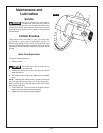
Chart 2: Crown Molding Angled to Table and Fence
Crown Molding
Angled Against
Fence
45º Miter
Crown Molding
Support
FIG. 32
MAXIMUM SIZE 4-1/2"
WARNING
!