


#/<@3-/
</@/8>3@/7+38>/8+8-/
:/<09<7/.,C?8+?>29<3D/.
:/<=988/67+C</=?6>3873=:6+-38190
38>/<8+6A3</=+8.-97:98/8>=A23-2
-9?6. -+?=/ =/<39?= 2+D+<. We
recommend that all tool service be performed
by a Skil Factory Service Center or
Autho rized Skil Service Station.
$%"$
Your Skil tool has been properly lubricated
and is ready to use. It is recommended that
tools with gears be regreased with a special
gear lubricant at every brush change.
""%##
The brushes and commutator in your tool
have been engineered for many hours of
dependable service. To maintain peak
efficiency of the motor, we recommend every
two to six months the brush es be examined.
Only genuine Skil replace ment brushes
specially designed for your tool should be
used.
"#
After about 300-400 hours of operation, or at
every second brush change, the bearings
should be replaced at Skil Factory Service
Center or Au thorized Skil Service Station.
Bearings which become noisy (due to heavy
load or very abrasive material cut ting) should
be replaced at once to avoid overheating or
motor failure.
6/+8381
$9+@93.+--3./8>=+6A+C=
.3=-988/->>2/>9960<97
>2/ :9A/<=?::6C,/09</-6/+83819<
:/<09<7381+8C7+38>/8+8-/ The tool may
be cleaned most effectively with compressed
dry air. 6A+C=A/+<=+0/>C19116/=A2/8
-6/+8381>996=A3>2-97:</==/.+3<
Ventilation openings and switch levers must
be kept clean and free of foreign matter. Do
not at tempt to clean by inserting pointed
objects through openings.
/<>+38-6/+8381+1/8>=
+8. =96@/8>= .+7+1/
:6+=>3-:+<>= Some of these are: gasoline,
carbon tetrachlo ride, chlo rinated cleaning
solvents, ammonia and house hold detergents
that contain ammonia.
"#
Blades become dull even from cutting regular
lumber. If you find yourself forcing the saw
forward to cut instead of just guid ing it through
!
WARNING
+38>/8+8-/
-12-
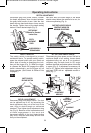
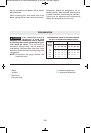
" %$#
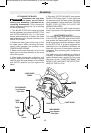
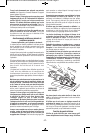
The combination blade provided with your saw
is for both cross cuts and rip cuts. Ripping is
cutting lengthwise with the grain of the wood.
Rip cuts are easy to do with a rip fence (Fig.
13). Rip Fence is available as an accessory (not
included). To attach fence, insert fence through
slots in foot to desired width as shown and
secure with the wing nut (not included).
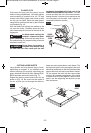
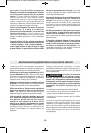
" "%
When rip cutting large sheets, the rip fence
may not allow the desired width of cut. Clamp
or nail a straight piece of 1" (25 mm) lumber to
the sheet as a guide (Fig. 14). Use the right
side of the foot against the board guide.
FIG. 13
RIP FENCE
WING NUT
DESIRED
WIDTH OF CUT
DESIRED LINE
OF CUT
RIP BOARD
GUIDE
FIG. 14
!
WARNING
!
CAUTION
SM 1619X05344 03-10:SM 1619X05344 03-10 3/10/10 3:06 PM Page 12