


6. Removethebackplatefromthelatheand
placeitonaworkbench.
7. Setthechuckonthebackplate,androughly
alignthechuckusingthealignmentset
screws.
8. Useatransferpunchtomarkthebackplate.
Ifatransferpunchisnotavailable,adrill
bitofthesamesizeasthemountingholesin
thechuckcanbeused.Lightlytaponthebit,
rotateit90°andtapitagain.
9. Centerpunchthemarks.Drillandtapthe
holesforM10-1.5threads.
10. Cleanandstoneallmatingsurfacesuntil
theyareperfectlycleanandnoburrsexist.
11. InstallthechuckandsnugtheM10-1.5cap
screwsinanalternatingpatternuntilyou
reachanaltorqueof53.5ft/lbs.Alternating
thetighteningprocessavoidschuckwarpage.
Ifyouareinstallingthechuckbythreading
theM10-1.5hexboltsintothechuckfrom
thebacksideofthemountingplate,repeat
Step 11onthesebolts,andtorquethebolts
to30 ft/lbs.
12. Usinga6mmhexwrench,lightlysnugall
fourchuckalignmentsetscrews.
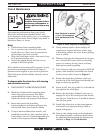
13. Clampa1"diametertestblankintothe
chuck,installatestindicator.Rotatethe
chuckbyhandandmeasurethechuck
concentricity.
14. Basedonyourreadings,adjustthe
alignmentsetscrewstobringthechuck
intonalalignment.Thetypicalalignment
repeatabilityforthesamediameter
workpiecewhenswappingwillbe0.0005".
Formaximumaccuracy,clampyour
workpieceinthechuckandrealignby
tighteningorlooseningthesetscrews.If
allthesetscrewsaretight,correctionof
alignmentcanalsobedonebylooseningone
ormoresetscrews.
Note: Ifthechuckmustmove0.001"orlessto
bringtheworkpieceintoalignment,itisnot
necessarytoloosenthechuckmountingbolts
beforeusingtheadjustmentsetscrews.
Operation and Safety
• Chuck Key Safety:Achuckkeyleftinthe
chuckcanbecomeadangerousprojectile
whenthespindleisstarted.Alwaysremove
thechuckkeyafterusingit.Developahabit
ofnottakingyourhandoffofachuckkey
unlessitisawayfromthemachine.
•
Disconnect Power: Disconnectthelathe
frompowerbeforeinstallingandremoving
thechuckordoinganymaintenanceor
adjustments.Accidentallathestartupcan
causesevereinjuryordeath.
•
Secure Clamping: Athrownworkpiecemay
causesevereinjuryorevendeath.When
swappingthechuckjawpositions,usea
torquewrenchtore-torquetheM8-1.25
jawmountingcapscrewsto29ft/lbs.When
clampingaworkpiece,maximumgripping
forceisattainedatfulljawandscrollgear
engagement.Ifthejawandscrollgearare
partiallyengaged,clampingforceisreduced.
•
Chuck Speed Rating: Exceedingthe
maximumratedspeedindicatedonthe
chuck,orusingexcessivespindlespeeds
withanunbalancedworkpiece,cancause
theworkpiecetobethrownfromthechuck
causingasevereimpactinjuryorevendeath.
Alwaysusetheappropriatespindlespeedfor
thejob.
•
Large Chucks: Largechucksarevery
heavyanddifficulttograsp,whichcanlead
tocrushedfingersorhandsifmishandled.
Getassistancewheninstallingorremoving
largechuckstoreducethisrisk.Protectyour
handsandtheprecisiongroundwaysby
usingachuckcradleorpieceofplywoodover
thewaysofthelathewhenservicingchucks.
•
Safe Clearances: Oftenchuckjawswill
protrudepastthediameterofthechuckand
cancontactacoolantnozzle,tooling,tool
post,ornearbycomponents.Beforestarting
thespindle,makesuretheworkpieceand
thechuckjawshaveadequateclearanceby
rotatingthespindlethroughitsentirerange
ofmotionbyhand.
-2-
Mfg.Since3/10
ModelSB1314
INSTRUCTIONS