


7
Charging the batteries
The charger requires approx. 10 hours to charge empty rechargeable batteries. For this charging, connect the
plug of the charger to the recharge jack of the unit. New or long-time out-of-use rechargeable batteries reach
their best performance after being charged and recharged fi ve times.
The batteries should only be charged when the laser is between 50° F and 104° F (10° C to 40°
C) Charging at a higher temperature may damage the batteries. Charging at a lower temperature
may increase the charge time and decrease the charge capacity, resulting in loss of performance
and shortened life expectancy.
HOW TO USE THE LASER
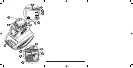
Laser Setup
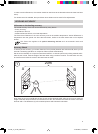
Position the unit horizontally (tripod mount and rubber feet downward!) on a stable platform, wall mount, or
tripod at the desired elevation.
Press the power button (1) to turn on the unit. The LEDs (3, 4 and 5) are turned on for 3 seconds. Self-leveling
will start at once. The unit is leveled when the leveling indicator (3) is no longer fl ashing (once every second).
The rotor will not spin until the unit is leveled. For the fi rst fi ve minutes after the laser self levels, the LED lights
solid then fl ashes every four seconds to let you know the laser is still level.
In order to switch the unit off, press the power button (1) again.
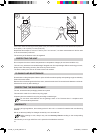
If the laser is positioned beyond its self-leveling range of ±8%, the manual and leveling indicators fl ash
simultaneously and a warning sound is emitted. Reposition the laser within its self-leveling range.
Self-leveling, Height Change (HI) Alert
Once turned on, the unit automatically levels itself in ranges of 8% (± 0.8 m / 10 m). In order to recognize
the leveling process at the measuring area and in order not to mark faulty heights during this operation, the
rotation stops.
Once leveled, the unit constantly monitors its level condition. The height change (HI) alert is activated 5 minutes
after self-leveling was performed and the laser is rotating at 600 min
-1
.
Level errors > 30 mm/10 m put the unit into alert mode because they are generally caused by a disturbance
that could lead to inaccurate measurements. When entering into alert mode, the prism stops, the laser beam
turns off, a warning sound is heard and the HI Warning LED (4) fl ashes 2 x per second. Turn the unit off and
then on again. To ensure your former elevation, now you have to check or arrange the exact height.
Manual Mode/Single Slope Mode
When you press the ‘M’ button (2) on the laser, the remote control, or the receiver-remote control, the laser is
set from automatic self-leveling mode to Manual mode. Manual mode is indicated by the fl ashing (once every
second) red LED (4). In Manual mode, the Y-axis can be sloped by pressing the Up- and Down-Arrow-buttons
on the remote control. Additionally, the X-axis can be sloped by pressing the Left- and Right-Arrow-buttons
on the remote control.
When you press the ‘M’ button again on the remote control, the laser is set into Single Slope mode. This is
indicated by the fl ashing red (4) and green (3) LEDs (once every second). In Single Slope mode, the Y-axis
can be sloped by pressing the Up- and Down-Arrow-buttons on the remote control, while the X-axis remains
in automatic self leveling mode (e.g. when setting up ramps or drive ways). The Height change (HI) alert is
still active.
Pressing the manual button at the laser or remote control again, changes the laser back to automatic self-
leveling mode as indicated by the fl ashing green LED (3).
041365_01_LL300_GB.indd 7 17.09.2004, 11:43:55 Uhr