


HD01 User Manual ◄ 11
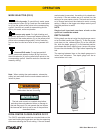
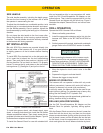
MODE SELECTOR (FIG 2)
Drill only mode: To use drill-only mode, press
mode selector button (B) g-2 and turn the mode selec-
tor (A) so the yellow arrow points to the corresponding
symbol. Use drill-only mode for screwdriving and for
drilling into metal, wood and plastics.
Hammer only mode: For light chiseling and
demolition applications. Press mode selector button (B)
g-2 and turn the mode selector (A) so the yellow arrow
points to the corresponding symbol. In this mode the
tool can also be used as a lever to free a jammed drill
bit.
Hammer/Drill mode: To use hammer/drill
mode, press mode selector button (B) g-2 and turn
the mode selector (A) so the yellow arrow points to the
corresponding symbol. Use this mode for concrete and
masonry drilling.
Note: When rotating the mode selector, release the
safety lock and check that the mode selector switch is
locked in place.
IMPORTANT
The tool must come to a complete stop before
activating the mode selector button or damage to
the tool may result. Do not operate the tool unless
the hammer/drill knob Is set to one of the positions
described above.
OPEN-CENTER CLOSED-CENTER OC/CC
The OC/CC selectable model has a knurled knob on the
spool end holding the trigger strut and has two opposing
set screws showing the circuit setting. If the set screws
are horizontal (cross-wise), the setting is for closed-cen-
ter circuits. If the set screws are on a vertical line, the
setting is for open-center circuits. The knob can be twist-
ed to change and should be checked to avoid a wrong
setting. A decal on the trigger strut helps remind you of
the knob positions to select.
NOTE:
Single circuit type tools now have a knob on the
spool but it cannot be rotated.
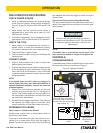
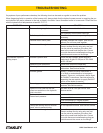
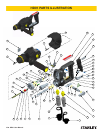
DEPTH GAUGE
Drilling depth can be set using the depth gauge mount-
ed on the side handle (see Figure 3). To set the gauge,
push down on the release button (G) on the side han-
dle, slide the depth gauge (C) to the desired position,
and release the button making sure it snaps into place.
Be sure the side handle (D) is tight before operating the
tool.
The spacing between lines on the depth gauge are in
inches and milimeters. The depth gauge can be re-
moved when not in use.
D
E
F
C
G
Figure 3
Do not select the operating
mode when the tool is running.
OPERATION