


12 ► HD01 User Manual
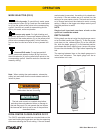
SIDE HANDLE
The side handle assembly, including the depth gauge,
ts over the front housing of the hammer drill to assist
the operator in maneuvering the tool.
To adjust the side handle to a comfortable position, twist
the hand grip in a counterclockwise direction and reposi-
tion the handle assembly. Once in position, tighten the
handle assembly by twisting the hand grip in a clockwise
direction.
Do not clamp the side handle to the front nose collar.
Clamp the handle only to the housing, against the body
shoulder. The side handle should be securely attached
to the hammer drill during op eration.
BIT INSTALLATION
Bits with SDS Plus shanks are mounted directly into
the tool holder of the hammer drill. It is a good practice
to slightly grease or oil the bit shanks before inserting
them.
To install SDS Plus shanked bits or the bull-point chis-
el bit, insert the bit shank into the tool holder/locking
sleeve. Then push the bit down and turn it slightly until it
ts into the slots. Pull on the bit to check if it is properly
locked. To remove the bit, push down on the tool holder/
locking sleeve (F) (See gure 3) and pull out the bit.
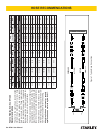
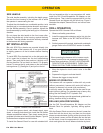
Figure 4. Hammer Drill Accessories
To install twin-groove shank, ratio thread shank, taper
shank, or through-hole shank bits, install the Drill Holder
Adapter as described above. Then simply screw the ap-
propriate bit holder onto the drill holder adapter. Figure 4
illustrates these adapters and bit holders.
To install the Geared Chuck for use with standard drill
bits and screwdriver bits in non-percussion drill mode,
install the Drill Chuck/Screwdriver Bit Adapter as de-
scribed above. Then install the appropriate bit into the
Geared Chuck and tighten with the chuck key. Figure 3
illustrates the adapter, Geared Chuck, and various stan-
dard bits.
DRILL OPERATION
Operate the HD01 Hammer Drill as follows:
1. Observe all safety precautions.
2. Install the appropriate adapters and/or bits into the
hammer drill. Refer to the BIT INSTALLATION for
details.
3. Set the hammer drill controls, side handle, and depth
gauge. Refer to the CONTROLS section for details.
4.
IMPORTANT
When operating the hammer drill in hammer mode,
always use drill bits and accessories designed for
impact type applications. DO NOT USE STANDARD
DRILL BITS OR ACCESSORIES. THESE CAN
CRACK OR FRACTURE DURING OPERATION.
Move the hydraulic circuit control valve to the ON
position.
5. Squeeze the trigger to activate the drill.
6. Release the trigger to stop the drill.
MODES OF OPERATION
The hammer drill can operate in either drill only mode
(without percussion), hammer drill mode (drill with per-
cussion) or hammer only mode (with percussion).
In drill only mode, the hammer drill can be used for pe-
riodic light duty drilling. For extended use or heavy duty
drilling use the Stanley DLO7 Hydraulic Drill.
The following sections provide operational guide lines for
drilling, hammer drilling or chiselling.
DRILLING (NON-PERCUSSION)
Use the Drill Chuck/Screwdriver Bit Adapter and the
Geared Chuck for periodic, light-duty drilling applica-
tions.
With the Geared Chuck mounted on the tool, loosen the
chuck rst with the chuck key, and then turn the chuck
sleeve counterclockwise (looking at the chuck end of the
tool) by hand. Loosen until the bit shank ts into the hole
for the shank. Insert the appropriate bit shank into the
chuck and tighten the chuck sleeve clockwise by hand.
OPERATION