


HGE12 User Manual ◄ 11
Storage Recommendations
1. The best storage place is one that is cool and dry
away from direct sunlight and excess heat or cold.
2. Long storage will not harm the battery pack or
charger. Under proper conditions, they can be stored
for 5 years or more.
SAVE THESE INSTRUCTIONS FOR FU-
TURE USE OPERATION
WARNING: To reduce the risk of serious per-
sonal injury, turn tool off and disconnect tool from
power source before making any adjustments or
removing/installing attachments or accessories.
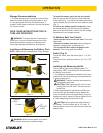
Installing and Removing the Battery Pack
NOTE: Make sure your battery pack is fully charged.
WARNING: Make sure the switch is in the off
position before removing or installing battery.
To install the battery pack into the tool handle,
align the base of the tool with the notch inside the
tool’s handle (Fig. 1) and slide the battery pack rmly
into the handle until you hear the lock snap into place
(Fig. 1).
To remove the battery pack from the tool, press
the release buttons (A) and rmly pull the battery
pack out of the tool handle. Insert it into the charger
as described in the charger manual.
To Maintain Safe Tool Control
• Never operate the tool with one hand. Grind with
both hands.
• Disconnect battery from tool before making ad-
justments, changing bits, or cleaning tool.
• Do not start the tool with bit engaged in the
material. The bit may grab the material.
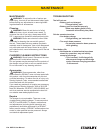
Switch (Fig. 2)
To start the motor, slide the switch (B) to “I” or “On”
position.
To stop the motor, slide the switch to (C) “O” or “Off”
position.
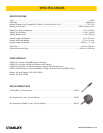
Installing and Removing the Bit
This tool has a tool-free bit change system. To
change bits, FIRST turn off the tool and disconnect
the battery from the tool.
1. To replace bit, depress both spindle lock (D) and
collet lock (E) and turn collet grip counterclockwise.
2. Insert or remove bit.
WARNING: The bits are sharp and should be
handled with great care.
CAUTION: When replacing bits, do not insert
cutting utes into the collet. This may result in
broken bits.
3. While depressing both spindle and collet locks,
turn the collet grip clockwise to rmly tighten the
collet. For some heavy duty applications, it may be
necessary to use a wrench to further tighten the nut
(F) while depressing the spindle lock (D).
CAUTION: Never tighten the collet without a
bit installed. This tool comes with a 1/4” collet. To
change collets, remove the collet nut and insert the
desired collet.
Figure 1
A
B
C Figure 2
Figure 3
D
E
SPINDLE
LOCK
COLLET
LOCK
F
OPERATION