


6
-Position0isstraightcutting.
-Positions1,2,and3areorbitalcutting.
-Theaggressivenessofthecutincreasesastheleverisadjustedfromonetothree,with
threebeingthemostaggressivecut.
LED LIGHT
Thejigsawisequippedwithalightwhichprojectsonthecuttingpath.
-Thelightwillcomeonwhenthetriggerswitchisdepressed
and will go off when the trigger switch is released.
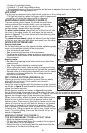
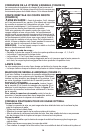
REMOVABLE SHOE SLEEVE (FIGURE F)
Thenon-marringshoesleeve(5)shouldbeusedwhen
cuttingsurfacesthatscratcheasily,suchaslaminate,
veneer,orpaint.Itcanalsobeusedtoprotecttheshoe
surface during transportation and storage.
To attach shoe sleeve,placethefrontoftheshoe(6)into
thefrontoftheshoesleeve(5)andlowerthejigsawas
shown in figure F.Theshoesleevewillclicksecurelyonto
the rear of the shoe.
To remove shoe sleeve, graspthesleevefromthebottom
at the two rear tabs and pull down and away from the shoe.
HINTS FOR OPTIMUM USE
Sawing laminates
Asthesawbladecutsontheupwardstroke,splinteringmay
occur on the surface closest to the shoe plate.
• Useafine-toothsawblade.
• Sawfromthebacksurfaceoftheworkpiece.
• Tominimizesplintering,clampapieceofscrapwoodor
hardboardtobothsidesoftheworkpieceandsawthrough
this sandwich.
Sawing metal
• Beawarethatsawingmetaltakesmuchmoretimethan
sawing wood.
• Use a saw blade suitable for sawing metal.
• Whencuttingthinmetal,clampapieceofscrapwoodtothe
backsurfaceoftheworkpieceandcutthroughthissandwich.
• Spread a film of oil along the intended line of cut for easier
operationandlongerbladelife.Forcuttingaluminum,
keroseneispreferred.
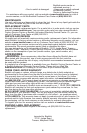
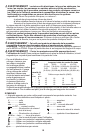
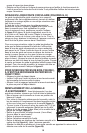
RIP / CIRCLE CUTTING (FIGURE G, H)
Ripping and circle cutting without a pencil line are easily
donewiththeripfence/circleguide(notincluded-
availableatextracost).
Usingthescrewsuppliedwiththeaccessoryguide,position
as shown in figure G and thread the screw into the shoe to
clamp the fence securely.
Whenripping,positionasshowninfigure G and slide
the rip fence under the screw from either side of the saw. Set the cross bar at desired
distancefrombladeandtightenscrew.Forripping,thecrossbarshouldbedownand
againstthestraightedgeoftheworkpieceasshown.
Whencirclecutting,adjustripfencesothatdistancefrom
blade to hole in fence arm is at the desired radius and
tightenscrew.Placesawsothatholeinfencearmisover
centerofcircletobecut(drillholeforbladeorcutinward
fromedgeofmaterialtogetbladeintoposition).When
sawisproperlypositioned,driveasmallnailthroughhole
infencearm.Usingripfenceasapivotarm,begincutting
circle.Forcirclecutting,thecrossbarshouldbeup,as
shown in figure H.
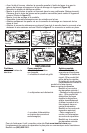
making a pocket cut (Figure i),
it is not necessary to drill a pilot hole:
• Markthedesiredstartingpoint.
• Tiltthetoolforwardandplacetheroundedfrontedgeof
thesawshoeontheworkpiece.
• Switchthetoolonandslowlyfeedthesawbladeintothe
workpieceatthedesiredstartingpoint.
G
H
I
F