


CLINCHER REPLACEMENT:
1. Loosen the clincher adjusting clamp screw.
2. Slide the clincher adjusting clamp to the highest position. Retighten clamp screw. The clincher screws will be
aligned with and visible through the 2 round holes in the back of the machine frame. Insert a socket screw
wrench to loosen and remove screw holding clincher.
3. Grasp the clinchers by hand or with pliers and lift off the anchor dowels.
4. To assemble new clincher and screw, clean parts thoroughly. Degrease threads with Loctite Safety Solvent
#75559; apply Loctite Grade 222 to screw threads and assemble. Refer to Loctite’s instructions. Tighten
screw firmly.
5. Re-adjust the clincher adjusting clamp to the desired setting and tighten.
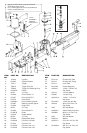
DRIVER REPLACEMENT:
1. Remove the magazine.
2. Remove the driver retaining screw, Item 13. Driver may now be removed from the housing.
MAGAZINE REPLACEMENT:
1. Remove staples from magazine.
2. Loosen the two magazine binding screws and nuts.
3. Pull magazine out of engagement with the frame.
4. Insert new magazine making sure the front edge contacts the rear of driver guides. Centralize magazine in
driver guides with binding screws. Tighten the magazine binding screw and nut so that magazine is securely
held.
CAUTION:
DO NOT TIGHTEN THE MAGAZINE BINDING SCREW EXCESSIVELY AS TOO
MUCH PRESSURE WILL DAMAGE THE MAGAZINE.
DRIVER BLOCK PIN REPLACEMENT:
1. Remove piston rod and driver block assembly from machine.
2. Remove as much flare on end of driver block pin as possible.
3. Use a rod smaller than pin diameter as a punch and drive pin free.
4. To reassemble, insert new driver block pin thru driver block and piston rod. Support driver block pin on head
and flare opposite end. Only a slight flare of approx. .020 greater than pin diameter is required to retain pin
and provide proper linear movement of pin in assembly.
Always disconnect air supply: 1.) Before making adjustments; 2.) When
servicing the tool; 3.) When clearing a jam; 4.) When tool is not in use; 5.)
When moving to a different work area, as accidental actuation may occur,
possibly causing injury.
When working on air tools note the warnings in this manual and use extra
care when evaluating problem tools.
Always disconnect air supply: 1.) Before making adjustments; 2.) When servicing the
tool; 3.) When clearing a jam; 4.) When tool is not in use; 5.) When moving to a
different work area, as accidental actuation may occur, possibly causing injury.
When working on air tools note the warnings in this manual and use extra care
when evaluating problem tools.
Always disconnect air supply: 1.) Before making adjustments; 2.) When servicing the
tool; 3.) When clearing a jam; 4.) When tool is not in use; 5.) When moving to a
different work area, as accidental actuation may occur, possibly causing injury.
When working on air tools note the warnings in this manual and use extra care when
evaluating problem tools.