


User's Manual
9
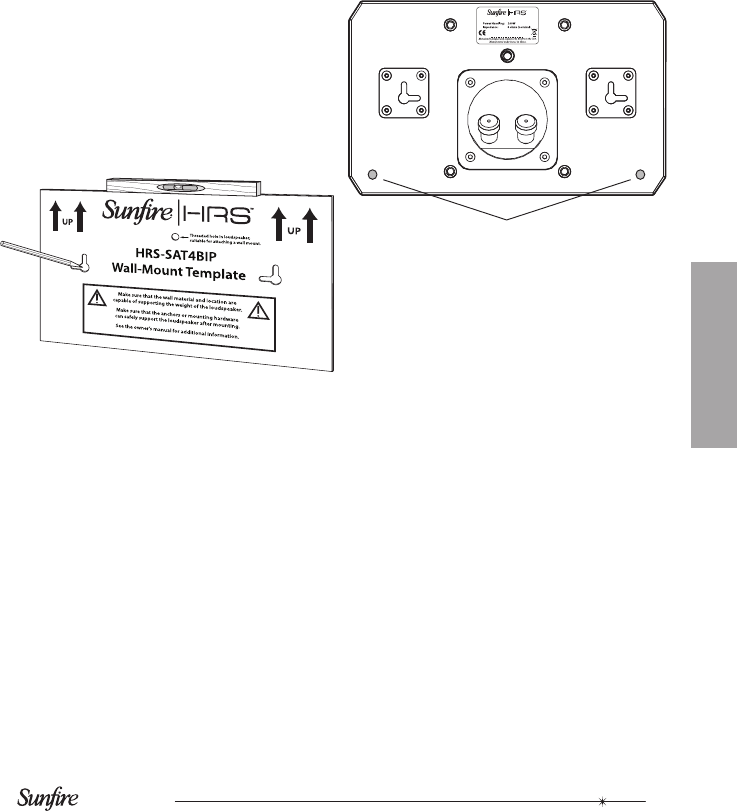
Wall-mounting the
HRS-SAT4BIP
The HRS-SAT4C comes with a wall-
mount template to help mark the correct
position for the two mounting screws. It is
recommended that you get at least one
of the screws into a wall stud, if possible.
If this is not possible, then two dry wall
anchors and screws are supplied.
1. Use a studnder to nd the location
of a suitable wall stud.
2. Position the wall-mount template
so that one of the holes is over the
wall stud centerline, at the right
height. Use a level to make sure
that the two holes are horizontal (or
vertical, if that is your preference).
3. Mark the wall with a pencil in the
location of the two holes, and
remove the template.
4. Put on your safety glasses. With a
5/16" drill bit, drill through the dry
wall at each mark, without drilling
into the wall stud. Remove any
dust.
5. For holes into a wall stud, screw in
the supplied woodscrew into the
wall stud by hand, until the head is
sticking out approximately 1/8".
6. For holes into dry wall, press a dry
wall anchor into each hole, and
gently tap them in ush. Tighten the
screws by hand, until the heads are
sticking out approximately 1/8".
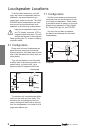
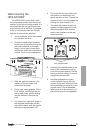
7. To reduce the chance of the loud-
speaker vibrating against the wall,
place the supplied anti-vibration
pads in two locations on the rear
panel as shown.
8. Connect your speaker wires to the
back of the loudspeaker, making
sure of the correct polarity. Secure
the wires so their weight is not pull-
ing against the terminals.
9. Hold the loudspeaker in place,
so the keyholes line up with the
screws on the wall. Make sure that
the screwheads are securely in the
keyhole slots. If the loudspeaker
feels loose, drive the screws in fur-
ther and remount the loudspeaker.
High Resolution Series HRS-SAT4BIP
Anti-vibration pads