


PMD8129 Models
Owner’s Manual
OPERATION
INSTRUCTIONS FOR USE:
Charging The Battery
THE BATTERY(IES) MAY NOT BE FULLY CHARGED FROM THE FACTORY.
READ ALL INSTRUCTIONS THOROUGHLY PRIOR TO FIRST USE.
The Drills covered by this manual use the same battery and battery charger.
Your Drill comes complete with a rechargeable battery which we recommend
that you fully charge before the first use.
Drill must be charged for 8 hours prior to first use. After initial charge, allow
approximately 3 to 8 hours to recharge your battery.
The battery should be recharged when the drill does not operate up to its
normal performance level. Do not continue to operate the drill in this depleted
capacity. Recharge the battery immediately.
To increase the life of your battery, do not leave the battery charging for more
than 8 hours. While this is not a safety concern, overcharging may reduce the
life of the battery.
Overtime, if drill is not used, the battery will lose capacity. For maximum perfor-
mance, recharge the battery after prolonged storage or non-use periods.
NOTE: Before inserting or removing the battery from the charging base, always
ensure that the base is not plugged into a 120V power source.
1. To begin charging, remove the battery pack from the tool by pressing on the
battery release buttons on either side of the battery pack and pulling down.
2. Plug the battery pack into the battery charger making sure the positive (+) and
negative (-) poles of the battery match the positive (+) and negative (-) poles of
the battery charger.
NOTE: The battery will only fit into the battery charger and the tool one way.
3. Plug one end of the 120 Volt AC Adaptor into the battery charger and the other
end into any standard 120 Volt wall outlet. The RED LED indicator on the battery
charger will illuminate to indicate that the battery is charging.
4. Full charging will take between 3 to 8 hours.
NOTE: While the battery is placed in the charger, the RED LED indicator light will
remain on. If charging more than one battery, wait at least 15 minutes between
each charge. Use only the battery charger that is supplied with this tool. Using
another charger may cause damage to the battery.
WARNING: Never charge a battery pack again immediately after it has been
fully charged. This can give rise to the battery pack being overcharged and a
reduced battery life. DO NOT leave the battery pack in the charger for more than
8 hours.
7
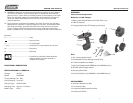
Using The Drill
CAUTION: Always make sure that the tool is switched
OFF and the battery pack is removed from the drill
before changing any bits.
Loosen the keyless chuck by holding the ring and
turning the sleeve counter clockwise. Select the drill bit
or screwdriver you want to use and place it in the
keyless chuck. Twist the sleeve of the keyless chuck
clockwise to tighten it, making sure the drill bit remains
in the center of the keyless chuck’s teeth.
Twist the 24 setting torque control ring to the desired
setting. Lower settings are better for light work such as
driving screws into soft materials. Higher settings are
recommended for drilling into harder surfaces.
When properly adjusted, the clutch will slip at its present
torque setting to prevent driving the screw too
deep or to prevent damage to the tool.
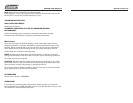
To operate the drill in forward setting,
simply keep the Forward/Lock/Reverse switch flat
against the side of the drill as shown. To change
to reverse setting, move the Forward/Lock
/Reverse switch until it is flat against the
opposite side of the drill. Keeping the Forward/
Lock/Reverse switch in the center position locks
the drill and prevents unintentional use. It is recommended that the Drill is in
the locked position when it is not in use or is being stored.
CAUTION: Always check the direction of the rotation before using the drill.
The speed of the drill is increased by the amount of pressure you place on the
ON/OFF trigger switch. The less pressure you put on the trigger switch, the
slower the drill will go.Your drill comes with an automatic braking function that
quickly stops the chuck from turning when the trigger switch is released.
Your drill has one speed (0-600 rpm).
Screwdriver Operation
Place the point of the screwdriver bit into the head of
the screw and apply slight pressure to the tool. Press
the trigger switch slightly and then gradually increase
the drill speed. Release the trigger switch as soon as
the clutch engages.
Note: Starting the drill at too high of a speed can
damage the drill bit or reduce the life of the bit.
Make sure that the driver bit is inserted straight in the
screw head or the screw may become damaged or will
not be inserted properly. When driving wood screws,
pre-drill pilot holes into the surface to make driving
easier. This will also prevent the wood from splitting.