


Models: PMD8137
PMD8142
Owner’s Manual
14. WARINING: Batteries vent hydrogen gas and may explode in the presence
of a source of ignition, such as a pilot light. To reduce the risk of serious
personal injury, never use any cordless product in the presence of an open
flame. An exploded battery can propel debris and chemicals. If exposed,
flush with water immediately for a minimum of 10 minutes and seek
medical attention.
15. During extreme conditions, the battery may leak. This does not indicate a
battery failure. However, if the liquid gets on your skin, immediately wash
with soap and water, neutralize the area with a mild acid such as lemon
juice or vinegar. If the liquid gets into your eyes, flush them with clean wa-
ter immediately for a minimum of 10 minutes and seek medical
attention.
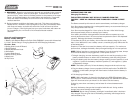
Controls and Components:
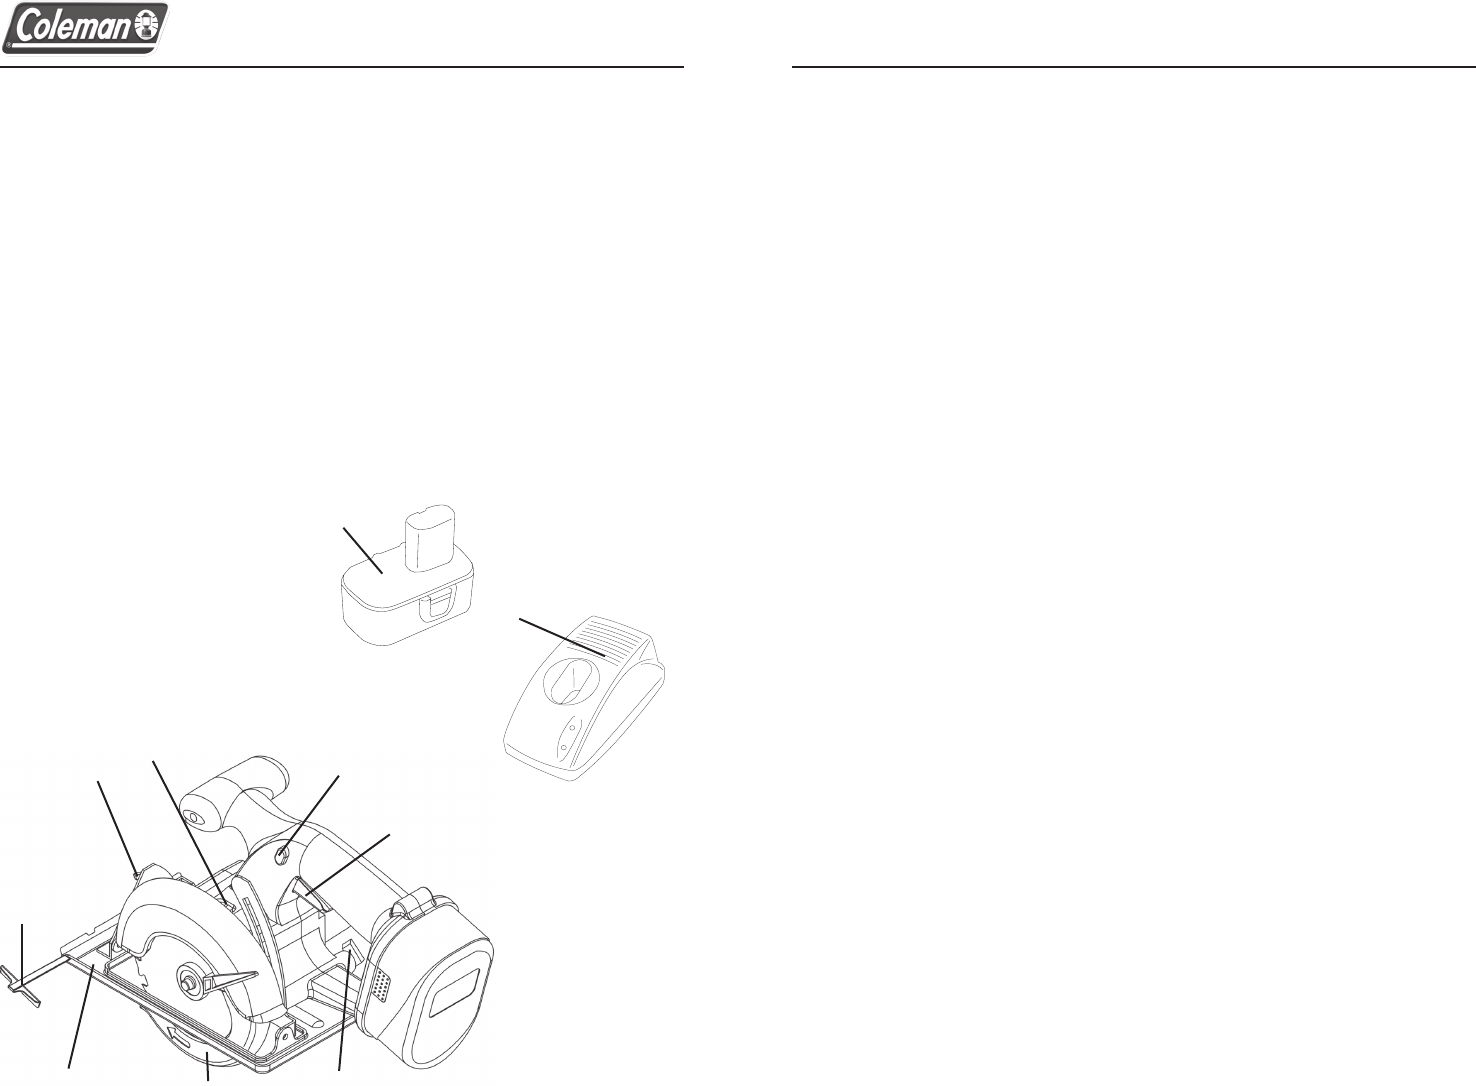
Battery and AC Charger
1. Battery with Release Buttons On Each Side (PMD8137 comes with 2 batteries)
2. 1 Hour “Quick Charge” Charging Stand with LED Charging Indicators
Circular Saw:
3. Safety Knob (Lock-off Button)
4. On/Off Switch
5. Depth Adjustment Knob
6. Shoe Base
7. Lower Blade Guard
8. Bevel Leveling Screw
9. Shaft Lock
10. Rip Fence
1
2
5
3
4
8
9
6
7
5
10
INSTRUCTIONS FOR USE:
Charging The Battery
THE BATTERY(IES) MAY NOT BE FULLY CHARGED FROM THE
FACTORY. READ ALL INSTRUCTIONS THOROUGHLY PRIOR TO FIRST
USE.
The Saws covered by this manual use the same battery and battery charger.
Your Saw comes complete with a rechargeable battery, we recommend that you
fully charge before the first use.
Your Saw must be charged for 1 hour prior to first use. After initial charge,
allow approximately 1hour to recharge your battery.
Your battery should be recharged when the saw does not operate up to its
normal performance level. Do not continue to operate the saw in this depleted
capacity. Recharge the battery immediately.
To increase the life of your battery, do not leave the battery charging for more
than 1 hour. While this is not a safety concern, overcharging may reduce the life
of the battery(ies).
Overtime, if the saw is not used, the battery will lose capacity. For maximum
performance, recharge the battery after prolonged storage or non-use periods.
NOTE: Before inserting or removing the battery from the charging base, always
ensure that the base is not plugged into a 120V power source.
1. To begin charging, remove the battery pack from the tool by pressing on the
battery release buttons on either side of the battery pack and pulling down.
2. Plug the battery pack into the battery charger making sure the positive (+) and
negative (-) poles of the battery match the positive (+) and negative (-) poles
of the battery charger.
NOTE: The battery will only fit into the battery charger and the tool one way.
3. Plug the battery charger into any standard 120 Volt wall outlet. The RED LED
indicator on the battery charger will illuminate to indicate that the battery is
charging.
4. Full charging will take 1 hour.
NOTE: While the battery is placed in the charger, the RED LED indicator light
will remain on. After one hour and a complete charge, the GREEN LED indicator
light will illuminate to let you know it is now safe to use the battery.
If charging more than one battery, wait at least 15 minutes between each
charge.
Use only the battery charger that is supplied with this tool. Using another
charger may cause damage to the battery.
WARNING: Never charge a battery pack again immediately after it has been
fully charged. This can give rise to the battery pack being overcharged and a
reduced battery life.
6