


7
other than that outlined above, refer to the Trouble
Shooting reference chart Section IV.
J. Be sure the detergent tank is clean, and then fill the
tank 1/8 full with clean water. Do not fill with the
detergent until start-up adjustments have been
completed.
K. (Review this paragraph in its entirety before initiating
the wash start button.)
Next, set the detergent volume setting per wash at
the detergent feeder. Manually initiate the wash
cycle by pushing the "Wash Start" button on the
control. The wash control duration is 80 minutes
and by means of a factory preset programmable
logic controller (PLC) will sequence the washing
events as previously outlined. When the detergent
pump is energized, note the amount that is used by
observing the reduction in the liquid level in the
tank. The usage should be approximately 1 part of
detergent to 20 parts of water. The water and
detergent requirements for each unit model are
listed in Table 1 on the Piping Schematic, Figure 5.
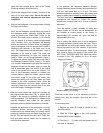
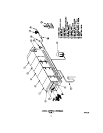
To adjust the volume output from the pump, refer to
the Detergent System Outline, Figure 4. The pump
is a constant displacement type and the amount of
detergent forced into the water supply to wash the
unit is dependent upon the setting of the control
valve in the bypass return line to the reservoir. The
side of the translucent reservoir is marked with
volume markers. Adjust the control valve to obtain
the correct usage for the given unit model, then
secure the setting with the Allen head set screw
located in the valve adjustment knob. When the
correct adjustment has been made, remove the
remaining water from the reservoir and fill the tank
with initial supply of detergent furnished.
L. When the wash control has cycled out, manually set
the programmable timer relay (TR), or initiator clock,
located in the control for automatic initiation of the
washing operation. This setting can be tailored to the
washing frequency best suited for the specific
application and may be best explained by example.
Suppose the application of the equipment is to clean
restaurant kitchen exhaust air. The collected
contaminant to be washed away is of greasy nature,
containing particulate such as smoke and fume from
the grill, mist and vapors from the French Fryer, flour
dust and other various matter that is created by
normal kitchen operation.
In our example, the restaurant operates Monday
through Saturday (closed Sunday) and opens daily at
6:00 a.m. and closes daily at 11:30 p.m. This busy
schedule presents a relatively heavy dirt loading and
being of greasy nature should be washed away daily.
The best time being shortly after closing when the
atmosphere has settled but before the greasy
contaminant collected has had a chance to harden
and setup.
From the above, a wash schedule of every day
except Sunday at 1:00 a.m. can be established. As
the duration of events preset at the factory is
approximately 80 minutes, the cycle will end at
approximately 2:20 a.m.
Prior to setting the initiator clock it will be necessary
to charge the battery located inside the clock. This is
accomplished by turning the selector switch on the
front of the control to the "ON" position. A light inside
the switch will glow. If it does not glow, check to be
sure there is supply line power to the control. DO
NOT PUSH THE WASH BUTTON. Allow the control
to remain in the "ON" position for 24 to 36 hours
while the battery is charging.
To set the initiator clock, it is first necessary to set the
existing time, then the program times that are to be
initiated.
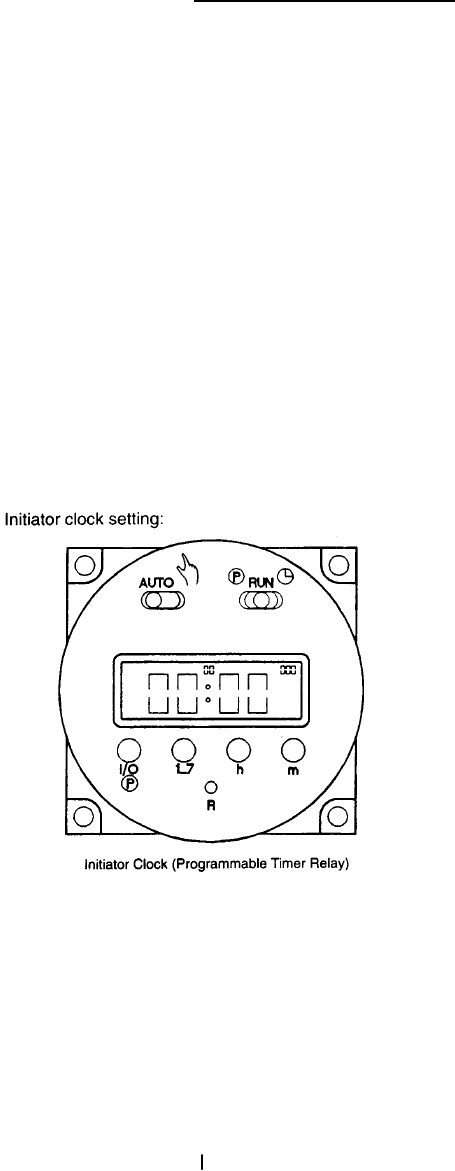
To set existing time:
1. Depress the reset (R) button to cancel out any
previous settings.
2. Slide the P-Run switch to the clock position.
Monday (MO) will be indicated.
3. Push the (1 ... 7) button until the present day of
the week is indicated.