


5
4
5.1 AC RECHARGE
During Recharge:
a) Never turn on while charging.
b) Make sure the AC power source is 120 volts, 60 Hz.
c) After recharge – disconnect cord and wait 5 minutes before use.
5.2 CHARGING INDICATORS
Unit includes charging indicator LED’s that display battery level of charge any
time during operation or storage by simply turning ON the area light. LED’s
willl light under the following conditions:
1. Automatically during AC recharge.
2. During area light operation.
During AC recharge green LED will blink when charging is complete. Wait 5
minutes after disconnecting charger to operate unit.
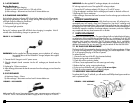
FIGURE 2 - AC CHARGER
WARNING: Use the supplied AC recharge adapter; do not substitute. AC recharg-
ing requires the use of the included AC charger/adapter that supplies
12 volts DC.
1. Connect the AC charger to an AC power source.
2. Plug the adapter’s barrel connecter into the AC recharge port located near the
handle.
3. Recharge for 18 hours maximum.
4. After recharge, disconnect the barrel connector from the recharge port and store the
adapter.
5.3 DC RECHARGE
a) Maximum charge - 5 hours
b) After recharge – disconnect cord and wait 5 minutes before use.
FIGURE 3 - DC CHARGER
Make sure the DC source (jump starter, battery pack, vehicle accessory socket, etc) is
12 volt DC. The DC source should be able to supply at least 10 amps at 12 volt DC.
WARNING: Use the supplied DC recharge adapter, do not substitute.
DC recharge requires the use of the supplied DC recharge adapter.
1. Connect the DC recharge adapter’s DC plug to a 12 volt DC source.
2. Plug the adapter’s connecter into the recharge port located on the back of the unit.
3. Recharge for 5 hours maximum.
4. After recharge, disconnect the barrel connector from the recharge port and store the
adapter.
6. PERIODIC MAINTENANCE
All batteries lose charge over time, especially when they are warm. AC recharge is rec-
ommended every two months, when not in frequent use. Use the AC recharger and
charge for the recommended time. If the unit gets dirty gently clean the outer surface of
the spotlight unit with a soft cloth moistened with a mild solution of water and detergent.
Periodically inspect the condition of recharge adapters, connectors, and wires. Replace
any components that may have become worn or broken.
7. PARTS REPLACEMENT
Three parts are replaceable by users. The quartz halogen bulb and sealed lead acid battery
are proprietary and are available through Vector Products, Inc.. A substitute 12 volt H3 100
watt bulb may be used instead of a Vector bulb. These can also be purchased from popular
automotive parts suppliers nationwide. The DC charging adapter fuse is replaceable.
Contact Vector Products, Inc.’s Technical Support Department for replacement parts and any
additional information that you may need. They may be reached toll free 866-584-5504.
7.1 DC PLUG FUSE REPLACEMENT
The fuse in the DC plug protects the charging circuit of the DC recharge adapter. If there
is no slight warming of the DC plug during recharge, you should suspect that 12 volts
DC is not powering the plug or the fuse is opened.
To replace the fuse:
1. Unscrew the end cap of the DC plug (counterclockwise).
2. Remove spring center contact and fuse.
3. Check fuse with a continuity checker.
4. If blown, locate replacement fuse with same type and rating.
5. Replace the fuse, spring, contact and end cap.
6. Screw end cap clockwise until it is finger tight-
do not over-tighten.
7. Check for proper operation of DC charging adapter.
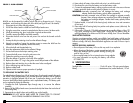
7.2 SPOTLIGHT BULB REPLACEMENT
To replace the H3 type 12 volt bulb, you will need a small Phillips-head type screwdriver
and a replacement bulb.
“O” RING
PHILLIPS
HEAD SCREWS
RUBBER BEZEL
LENS
REFLECTOR
FIGURE 4 - LENS ASSEMBLY