


7
6
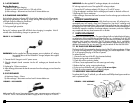
Bulb life can be shortened by installing a bulb with dirt or fingerprints on it. During
installation, avoid touching the glass part of the bulb (see Figure 4 and 5 for details).
1. Disconnect the unit from charging adapter.
2. Pull off the rubber bezel to reveal two small Phillips-head screws.
3. Using the screwdriver, remove (counterclockwise) the two screws. Set them aside.
4. Lift off the retaining ring, glass, and rubber ring and set them aside.
5. Carefully remove the reflector and bulb assembly.
6. Disconnect the bulb wire from the red power wire and set the burned out bulb
aside.
7. Unsnap the hairpin retaining wires from the reflector’s flange.
8. Using the screwdriver, loosen the retaining screw to remove the bulb from the
reflector (no need to completely remove this screw).
9. Lift out the bulb and the attached wire.
10. Insert the replacement bulb into the reflector’s flange.
11. Put back and secure the hairpin retaining wires.
12. Connect the bulb power wire to the red power wire.
13. Tighten the retaining screw on the flange.
14. Place the reflector in position in the body of the spotlight.
15. Replace the rubber “O” ring in the groove around the perimeter of the reflector.
16. Replace glass and retaining ring so that the screw holes are aligned.
17. Secure retaining ring with two screws.
18. Replace rubber bezel.
19. Operate switch to ensure proper operation of spotlight.
7.3 REPLACING THE BATTERY PACK
The sealed lead acid battery has a life of several years, if recharged promptly after each
use. When a fully charged battery only provides about ten minutes or less of spotlight
operation, it should be replaced with a new one. To replace the battery, you will need
a narrow shaft Phillips-head screwdriver and a replacement battery. The battery pack
can be replaced by doing the following:
1. Complete the bulb replacement steps through step 4, to remove the reflector
assembly.
2. Remove all the Phillips-head screws (counterclockwise) that fasten the two halves of
the housing body.
3.
Separate the two body halves and carefully pop out the handle.
WARNING: DO NOT ALLOW BARE WIRES OR CONNECTORS TO CONTACT
EACH OTHER; DANGEROUS SPARKING CAN OCCUR.
4. Note polarity of battery. Note which color wire is on which terminal.
5. Disconnect the wires from the battery and set the battery aside.
6. Connect the replacement battery, making sure the correct color wires are on the new
battery terminals. Make sure the polarity of battery is correct.
WARNING: Incorrectly connected wires will damage the battery and recharge
adapter, double check battery polarity before reassembly.
CAUTION: Incorrectly connected wires will allow the spotlight to operate normally,
however, when recharge adapters are connected, there will be damage to
the battery and recharge adapters. Double check battery polarity before
reassembly!
7. Replace handle, in one half of the housing body. Make sure wires and connectors
do not touch.
8. Place other half of housing body into position and replace screws (clockwise). Do
not overtighten.
9. Follow steps 13 through 19 for bulb replacement to reassemble reflector, rubber “O”
ring, glass, retaining ring and rubber bezel. Charge the new battery using AC
recharge adapter for a minimum of 20-25 hours initially, then 18 hours thereafter.
SAFE BATTERY DISPOSAL
Contains a maintenance-free, sealed, non-spillable, lead acid battery, which must be
disposed of properly. Recycling is required, contact your local authority for information.
Failure to comply with local, state and federal regulations can result in fines or impris-
onment.
BATTERY DISPOSAL WARNING
• Do not dispose of the battery in fire as this may result in an explosion
• Before disposing of the battery, protect exposed terminals with
heavy-duty electrical tape to prevent shorting (shorting can
result in injury or fire)
• Do not expose battery to fire or intense heat as it may explode
• For more information on recycling this battery, call toll-free
877-288-7722
8. SPECIFICA
TIONS
Spotlight Bulb........................................12 volt, H3 series,
100 watt
quartz halogen
Battery..................................................Maintenance free, sealed lead acid, 12 volt
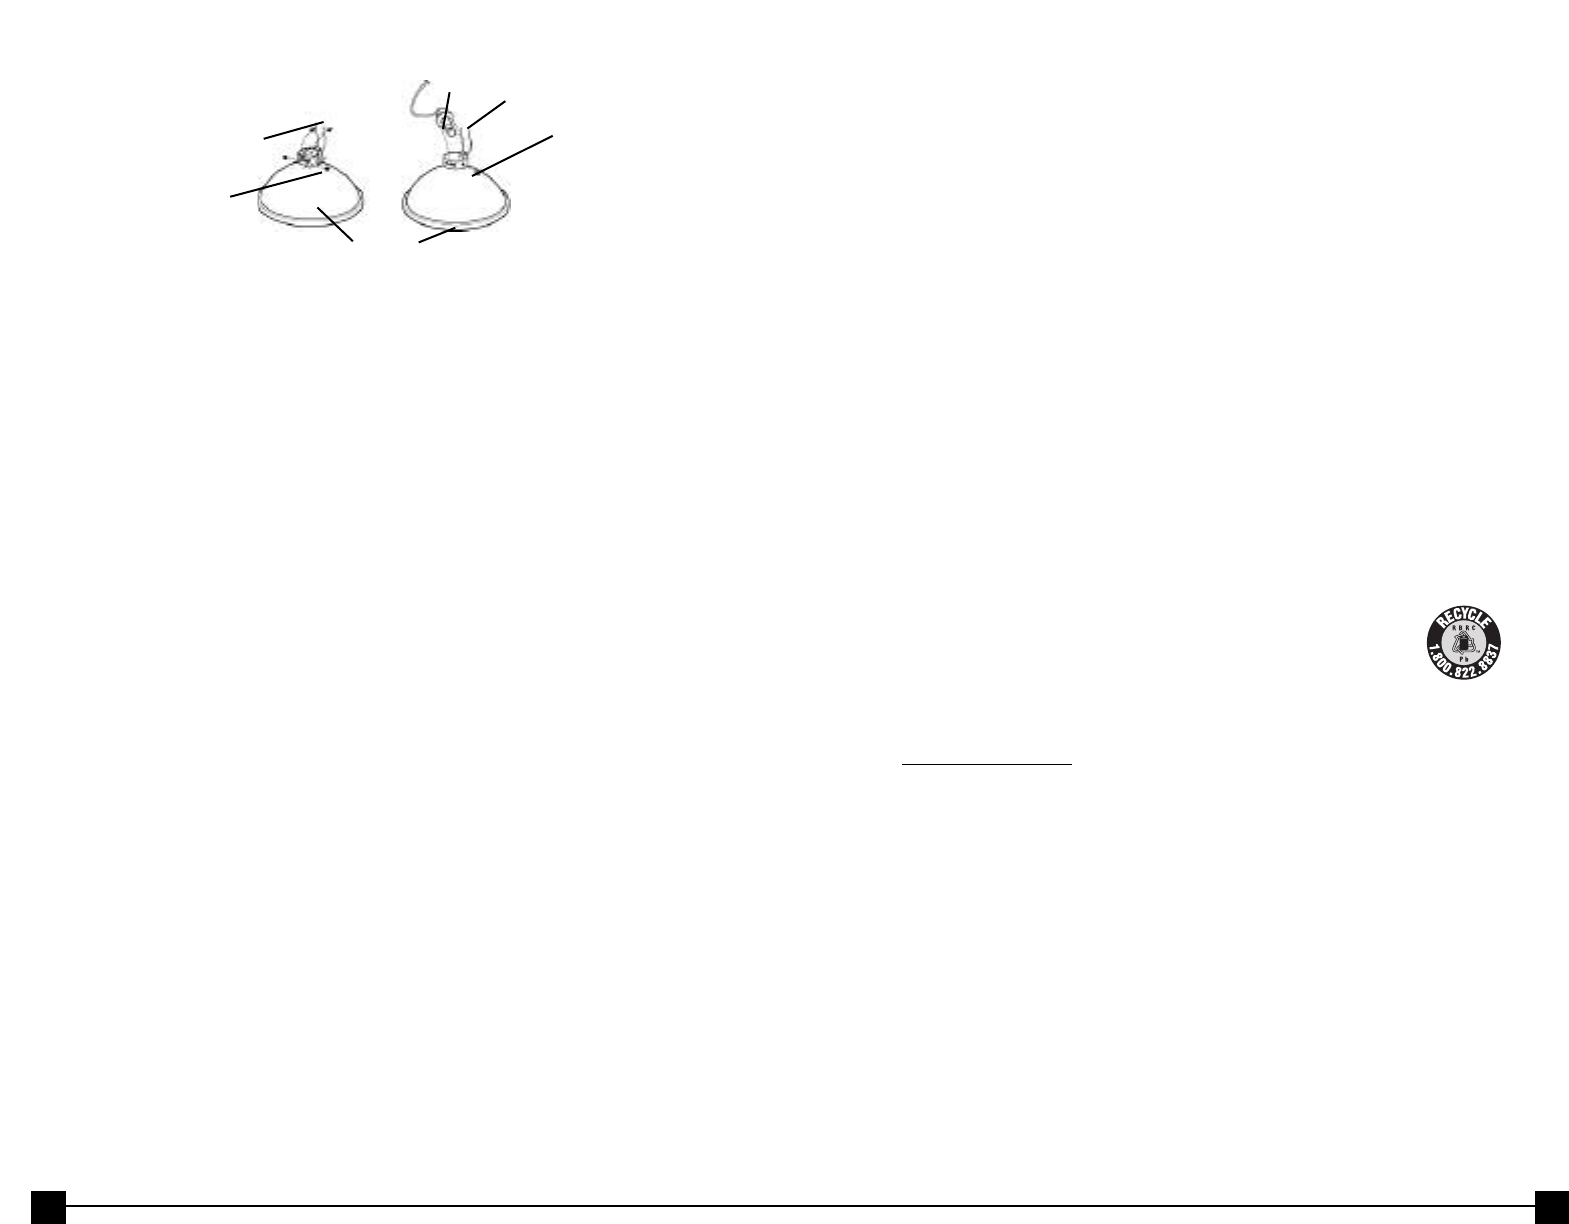
METAL PRONGS
P
HILLIPS HEAD SCREW
BULB
R
EFLECTOR
M
ETAL PRONGS
F
IGURE 5 - BULB ASSEMBLY
P
HILLIPS HEAD SCREW