


use the correction screw.
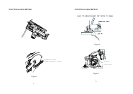
Adjusting the Cutting depth (See Fig.3&4)
For the cleanest possible cut, set the cutting depth whenever possible 5 mm
deeper than the thickness of the material. Slacken the swing nut for adjusting
depth of cut, set the cutting depth, and tighten the swing nut again.
Adjusting the cutting angle
Slacken the swing nut for adjusting angle of cut, set the cutting angle on the
scale, and tighten the swing nut again. Check angle of cut by making a test cut.
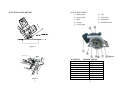
Adjusting the rip fence (See Fig.5)
Slacken the clamp nut and set the rip fence to the required cutting width by
means of the cutting line scale. Retighten clamp nut.
Sawdust ejection
The sawdust and wood-chips produced by the saw can be sucked up by a
vacuum cleaner or caught directly in the sawdust bag. They are not included in
standard equipment.
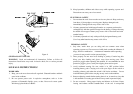
Switching the Machine ON and Off
For safety reasons this power tool is equipped with a switch lock that prevents
the ON/OFF switch from being locked in the ON position. (see figure 6)
Switching on: Press switch lock and then ON-OFF switch.
Switching off: Release ON-OFF switch.
Advice for operation
1. Switch on the machine and apply to the material with the front edge of the
guide plate.
2. Align the tool with the parallel guide or a line drawn by hand prior to
operation.
3. Hold the tool firmly by both handles and work applying light pressure.
INSTALLING AND REMOVING THE BATTERY PACK
NOTE: Make sure your battery pack is fully charged.
To install the battery pack into the tool handle, align the base of the tool with
the notch inside the tool’s handle and slide the battery pack firmly into the
handle until you hear the lock snap. To remove the battery pack from the tool,
press the release buttons and firmly pull the battery pack out of the tool handle.
Insert battery into the charger as described in the charger section below.
THE BATTERY PACK
Your tool uses an 18 volt battery pack. When ordering replacement battery
packs be sure to include catalog number and voltage.
CHARGERS
Your battery pack can be charged by a 1 hour charger. Be sure to read all safety
instructions before using your charger. Servicing at an authorized service center
is required to avoid damage to static sensitive internal components.
Read all of the instructions in the battery charger section to this manual before
attempting to charge the battery pack for your tool. Always use correct battery
pack. Never install any other battery pack, it will ruin your tool and may
create hazardous condition.
Charging procedure
1. The charger does not require adjustment and is designed to be as easy as
possible to operate. Please observe the procedure as follows:
13
1) Plug the charger into an appropriate AC power outlet.
14