


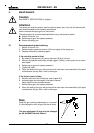

4. STARTING WORK, AND HANDLING
Caution
See SAFETY REGULATIONS in chapter 1.
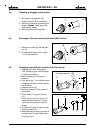
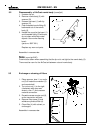
4.1 Preparation
● Locking of spray gun! Turn locking nut clockwise until stop (viewed from back of
gun)
● Check that spraying pressures are suitable.
● Check that all connections are tight and do not leak.
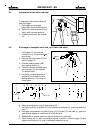
4.2 General rules for handling the spray gun
The following rules must be observed before any work is carried out on the
equipment or during breaks in work:
● Switch off control unit.
● Relieve spray gun and system pressure.
● Lock the spray gun with the locking nut.
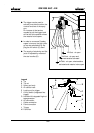
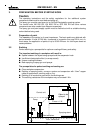
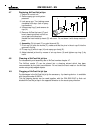
4.3 Start-up for AirCoat spraying
1. Connect earth cable to the earth terminal of the control unit. Fix the other end using
the clamp to the nearest earthed piece of the equipment (cabin, transport device,
or similar). Make sure that all other conductive parts within the work area are
earthed.
2. Connect material hose to spray gun and to pump.
3. Connect air hose to spray gun and to oil-free, dry air supply with regulator.
4. Connect cable to control unit VM 200 EN or EPP 200 EN.
5. Set material pressure (approx. 80 bar) at material pump and switch on control unit.
6. Spray (actuate trigger).
7. Adjust spraying pressure at the paint pump regulator, according to jet and object.
8. Now open AirCoat air (approx. 1 to 2.5 bar) and adjust for the optimum atomiza-
tion.
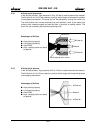
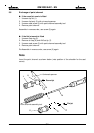
Adjusting round jet fan:
9. By turning the tip nut , the atomizing air jet can additionally be adjusted.
By exchanging tips, various paint outputs can be achieved.
Note
Do not close the gap for atomizing air between tip nut and body.
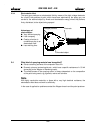
for flat jet process :
9. To change the jet width; fit another AirCoat flat jet nozzle, with the required fan an-
gle.
By exchanging tips, various paint outputs can be achieved.
GM 2000 EAC - EN
4.1