MAINTENANCE
Your White Brothers fork requires periodic maintenance to ensure peak performance and long life. Neglecting proper
maintenance will reduce the fork’s life. Internal build up of water and dirt or a lack of lubrication will cause excessive wear
and void the warranty.
BEFORE EVERY RIDE: Visually inspect your fork for bent or broken parts, loss of oil, abnormal sounds or other
indications of possible fork failure. Compress you fork to verify proper function. Check all other bicycle components to
ensure proper working order.
AFTER EVERY RIDE: Clean and dry the exterior of your fork. When cleaning the fork, do not direct the water spray at the
seals. Visually inspect your fork for damage.
*EVERY 30 HOURS OF RIDING: Your fork should be disassembled, inspect, cleaned and re-grease. If the fork appears to
be relatively clean, you can go 40 hours between servicing. If the fork appears excessively dirty you should service it every
20 hours. The three things that will effect the service interval and performance of your fork are water, mud and dust. How
much you use your fork in those conditions will determine how much service it requires.
*EVERY 100 HOURS OF RIDING: Complete service should include removing the lower fork legs cleaning and re-
greasing all shafts, bushings and seals. Check top cap assembly’s, damper cartridge, stanchion plug, brake bolts and shaft
bolts for proper torque. At this time, the fork should be carefully inspected for wear and damage before reassembly. Contact
White Brothers for replacement parts and service. We recommend that this service be performed by a certified White
Brothers service center or by the factory.
*White Brothers recommends that you consult with a qualified technician before performing:
Basic Fork Disassembly and Inspection
1. Disconnect the front brake and remove the wheel as outlined in you bicycle owners
manual.
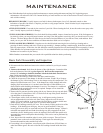
2. Remove the rebound knob from the bottom of the right dropout. Loosen the allen
bolts at the bottom of the fork legs(See figure #5). Back out the compression
screws 1\4” and using a dead blow hammer knock the bolts back into the lower
legs. Finish removing the compression screws.
3. Simply slide the fork legs off the end of the inner stanchion tubes.
4. Check the air pressure in the damper. It should be between 50 and 150 psi. Inspect
the damper leg for visible leakage. Push in the damper rod to full compression. The
damper rod should return on it’s own. If the damper has visible leakage and/or the
damping feels inconsistent as it is stroked, return the fork to White Brothers or a
dealer familiar with rebuilding the damper for service. The damper is a sealed unit
and should not be opened unless service is required. Damper service should be
performed by White Brothers.
5. Remove the air pressure from the spring side air cap. Remove the top cap and check
oil on the piston. It should have 10cc’s of fork oil on the top of the piston. Install air
cap and inflate to desired pressure.
6. Clean all parts with a clean, non-abrasive rag. A mild grease cutting cleaner or
solvent might make this an easier task. Once clean, inspect the seals for tears or
cracks. If in good condition, re-grease them with Slick Honey or other suitable non-
lithium grease. If your seals show signs of wear have them replaced.
7.Check the DU bushings carefully for wear. This is done by looking at the color of the
bushings. If the bushings are dark gray, they are in good condition. If they are
bronze/gold in areas, they are worn and can cause fork stanchion damage. If there is
noticeable movement back and forth when the legs are fully engaged on the fork
stanchions, the DU bushings may need to be replaced. Please note that special tools
are required to remove and replace these bushings. This service can be performed by
White Brothers.
8. Next, inspect the fork stanchion tubes for wear, nicks or scrapes. These will cause
premature wear on the seals and DU bushings. Check again for noticeable play
between the stanchion tubes and the fork lower.
9.If everything is free of problems, coat all parts with a liberal coat of Slick Honey or
other non-lithium grease. Be sure to lube the DU bushings located inside the lower
leg.
PAGE 5
Figure #5


