12
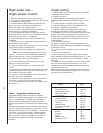
Right angle cuts --
single pieces of stock
1. Raise the saw arm to its full up, open position.
2. Pull up on the quick release handle on the locking vise
jaw and slide the vise jaws apart.
3. Place the stock on the saw table, between the vise
jaws. If the stock is long, support the stock with
appropriate infeed and outfeed supports.
4. Pull up on the quick release handle and slide the
locking vise jaw up against the workpiece.
5. Turn the lead screw handle until the quick release
thrust shaft falls into a groove on the lead screw and puts
light clamping pressure on the workpiece.
6. Lower the saw arm until the blade is just above the
workpiece.
7. Lock the saw arm in position by turning the hydraulic
feed needle valve clockwise.
8. Adjust the position of the stock until the cut-off distance
you require is directly under the blade.
9. Tighten the vise so the workpiece is clamped firmly.
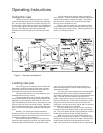
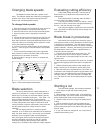
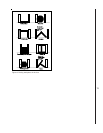
Note: if you are sawing a workpiece with a sharp
edge up -- use a file to knock off the sharp edge before
beginning any saw cuts. This will prevent damage to
teeth on the blade. See Figure 8 for details.
10. Turn the saw switch ON and allow the motor and
blade to come up to full speed.
11. If using a coolant system, turn on the valve at the
nozzle.
12. Carefully open the hydraulic control needle valve open
(counterclockwise) so the cutting arm lowers gently into
the workpiece and begins cutting.
13. Continue to open the hydraulic control valve until an
efficient cutting rate is established.
14. When the saw completes its cut, the motor will shut
off and the cut piece will fall away from the table.
15. If you are using a coolant system, turn it off the valve
at the nozzle.
165
160-165
115
90-100
105-135
90-115
80-140
105-115
40-80
40-70
80-100
55-90
55
90
40
40-45
25-40
80-160
Structural steel shapes
Low carbon steel
Medium carbon steel
High carbon steel
Cr-moly steel
Ni-Cr-moly steel
Chromium steel
Cr-vanadium steel
Tool steel
Stainless steel
Free machining steel
Cast iron
Copper alloy (CU-Zm)
Bronze
Al-bronze
Monel
Titanium alloy
Aluminum (T-6+)
Material Speed
Angle cutting
1. Raise the saw arm to full height and lock it in position
with the quick shut off valve.
2. Slide the vise open.
3. Set the stationary vise jaw to the angle required
according to the instructions in Adjusting stationary vise
jaw.
4. Put the workpiece in position on the saw table.
5. Adjust the locking vise jaw to the workpiece using
instructions in Adjusting the locking jaw.
6. Adjust the blade guide/support bearing brackets
according to instructions in Setting the blade guides.
7. Release the quick shut off valve and lower the arm and
blade to just above the workpiece, then lock the arm in
position using the hydraulic cylinder control needle valve.
8. Adjust the workpiece to the required cut-off position
under the blade.
9. Tighten the vise securely.
10. If you are starting your cut on a sharp edge, use a
file to knock off the sharp edge so the blade isn't damaged
at the start of the cut.
11. If using coolant or cutting fluid, turn on valve at the
nozzle.
12. Turn the saw switch ON.
13. Open the hydraulic cylinder needle valve until the
blade contacts the workpiece and establishes a cut -- then
open the control cylinder valve until the blade is cutting
efficiently.
14. When the cut is completed the motor will turn off and
the cut piece will fall away from the saw. Turn off the
coolant flow and repeat the steps above as necessary to
continue with more cuts.
Note: the stock stop can be used for multiple angle cuts in
the same way as described for straight cuts. See Using
the stock stop for repeated cuts.
Suggested cutting speeds for a variety of materials.
Speeds are recommended speeds for a 4 inch thick work
piece, a bi-metal blade, dry cutting. (No cutting fluid.
Speeds may be increased when cutting fluid is used --
observe chip formation to determine most efficient cutting
rate.)
Decrease these speeds 30-50% for carbon steel blades.
Increase speed 15% for materials 1/4 inch thick, 12% for
materials 3/4 inch thick, 10% for materials 1 1/4 inch thick,
and 5% for 2 1/2 inch thick material. Decrease speed
12% when cutting eight inch material. When selecting
blade tooth pitch, be sure to have two or more teeth in
contact with the material at all times to avoid tooth
breakage.
Table 1: Suggested cutting speeds


