


7
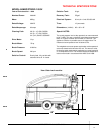
SABER/STRIDE II 28/34 98570 5/1/98
MACHINE OPERATION
STARTING MACHINE
NOTE: Perform pre-run machine check before operating
machine.
FOR SAFETY: Before starting machine, make sure that
all safety devices are in place and operating properly.
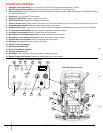
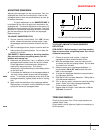
1. Turn the key switch clockwise to the “ON” position.
Move the directional control lever in the desired
direction.
FILLING THE SABER/STRIDE II
FOR SAFETY: Before leaving or servicing machine;
stop on level surface, set parking brake, turn off ma-
chine and remove key.
1. Set the parking brake, and turn “OFF” key switch.
2. Remove solution tank cover.
3. Fill the solution tank with clean water, leaving enough
room for the required amount of cleaning solution.
The solution tank capacity is 33 gallons (124.9 liters).
The water must not be hotter than 140°F (60°C) to
prevent damage to the tank.
4. Measure the chemical into the solution tank. Liquid
chemicals should be added to the solution tank after
filling with water. Dry chemicals should be thoroughly
mixed before being added into solution tank.
Commercially available, high alkaline floor cleaners
are suitable for use in the SABER/STRIDE II
solution system.
NOTE: Read the chemical manufactures recommended
proportion instructions.
5. Fill the solution 5” from the bottom of the fill inlet.
6. Replace solution tank cover.
Flammable materials can cause an explosion or fire.
Do not use flammable materials in the tanks
SCRUBBING WITH THE SABER/STRIDE II
Plan the scrubbing pattern in advance. The longest track is
around the perimeter of the area to be cleaned. For efficient
operation, the runs should be the longest possible without
turning, stopping, or raising and lowering scrub deck/
squeegee.
NOTE: In order to achieve the best possible results, the
area which is to be cleaned should be swept before scrub-
bing. Large debris, strings, wire must be removed to pre-
vent being caught in brushes or squeegee.
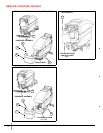
BEGIN SCRUBBING
1. Turn key switch to “ON” and release the brake.
2. Travel to the start of the scrub pattern. Press
the brush button number 1 on the console touch
pad to start the vacuum, brush motors, and lower
scrub deck and manually lower squeegee to the
floor.
3. Press the scrub pressure button to the desired
scrubbing pressure.
4. Finally adjust the solution flow using lever to the left
of the control panel.
STOP SCRUBBING
1. Raise the scrub head, again using button number
1. Allow directions lever to return to neutral
position after squeegee has passed beyond the
position where the scrub deck was raised.
Vacuum motor will cut off after an additional 14
second delay in order to clear the recovery system
of solution.
2. Turn the key switch "OFF” and set the parking
brake.
3. Pull back solution knob to full off position if
scrubbing operation is complete.
! WARNING