OPERATING INSTRUCTIONS
Step 1. Using satellite receiver, determine correct
elevation for your location. See your receiver manual for
details on how to obtain setup information.
Step 2. Press button on Winegard Digital Display Wall
plate. If antenna is in travel position, the display will show
HH for high limit. (LL for low limit.)
Step 3. Crank elevation handle to raise antenna. Stop
cranking when readout displays correct elevation for your
location. (Found on receiver setup menu.)
Step 4. Rotate antenna VERY SLOWLY until correct
satellite signal is acquired. NOTE: Rotate 2° and stop. DO
NOT rotate continuously even if you are rotating slowly. If
you notice elevation angle has changed, it could be due
the following reasons:
1. RV is not parked level.
2. Antenna system is mounted to a slightly sloped RV
roof. If this is the reason, when you have rotated the
antenna so it is facing in the approximate correct azimuth
(compass direction), simply adjust to correct elevation
and continue searching for signal.
Printed in U.S.A. Winegard Company • 3000 Kirkwood St. • Burlington, Iowa 52601-2000 © 2000 Winegard Company 2451955 Rev. 9/11/00
Special Notes: When you have detected the satellite
signal adjust the antenna up/down and left/right for
strongest signal your receiver displays. Due to variations
in receivers and installation methods, you may find the
elevation numbers after peaking on strongest signal no
longer match what the receiver recommended. This is
normal. The elevation sensor should always get you close
enough to pick up a signal to peak on. If display turns off
while you’re searching, just push button for another
minute of operation. After a little practice, most people
find the signal in 30 to 50 seconds.
Replacement Parts
To order repair parts, contact Winegard Company.
Customer service hours are 7:30 a.m. to 5:00 p.m.,
Mon. - Thu., 7:30 a.m. to 4:00 p.m., Fri., Central Time.
Call toll-free 1-800-288-8094. Credit card only, $5.00
minimum order. For parts, refer to page one of this
instruction sheet.
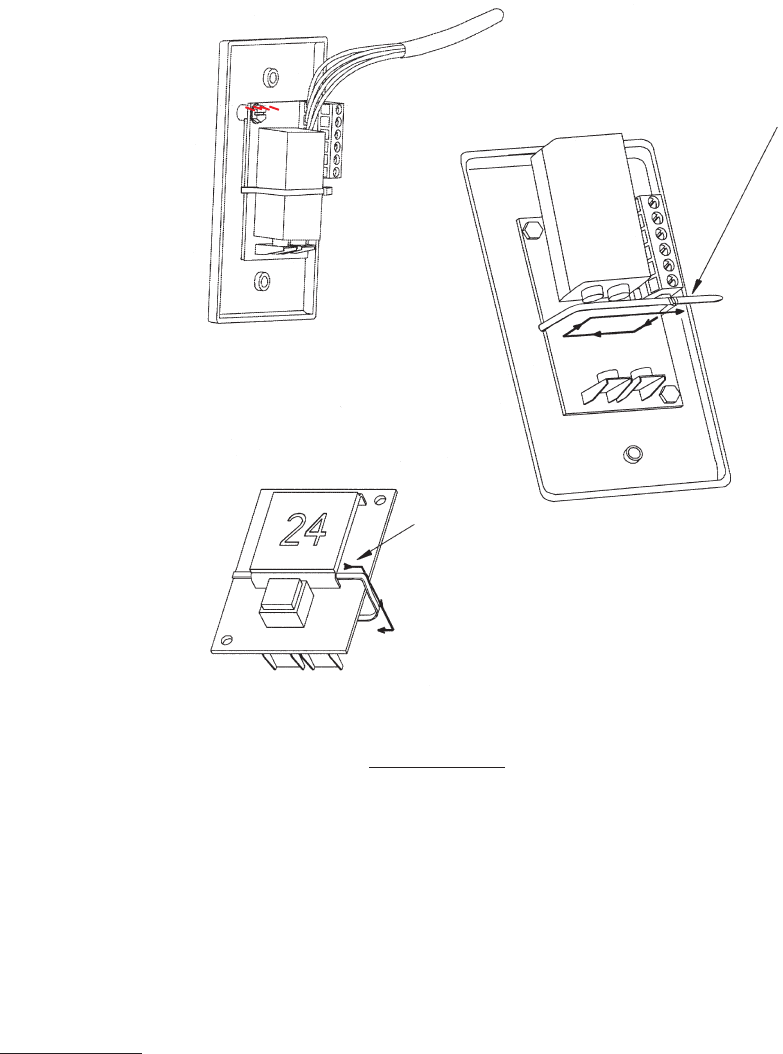
Be sure to feed cable
tie under the display
readout. (Wallplate not
shown for clarity.)
Slide battery
into place
and cinch the
cable tie
moderately
tight. Clip off
excess tie.
Figure 8
Wallplate display with
battery and sensor
cable attached.
* CAUTION: DO NOT connect to +12 VDC
if using a 9 volt battery. Use of 9 volt
battery recommended.
Step 9. Use the 9 volt battery (9 volt
recommended for best performance) or
hook up the +12 VDC. Pressing the
button should display 24 (+ or - 1 degree)
when antenna is in vertical position.
Display automatically turns off after
approximately 1 minute.
Step 10. Figure 8. It is recommended if
using 9 volt battery, a cable tie be
installed to secure the battery. The tie
should not be too tight because the
battery will need to slide out for
replacement.
STEP 11. CHECK CONNECTORS AND
CABLE ENTRY POINTS. MAKE SURE
THESE AREAS HAVE BEEN
PROPERLY SEALED TO PREVENT
WATER DAMAGE TO YOUR SYSTEM
AND PROPERTY.
Troubleshooting — EE readings on
display: Check wiring for poor connection
or incorrect wiring.
WIRING
