


9
OPERATION
NOTE: When AC power is available, the
default setting for the charger is ON. If the unit
was manually turned OFF and AC power is
interrupted and becomes available again, the
charger will return to ON.
LOW BATTERY - Red LED
• When the LED is OFF the battery
voltage is normal, between 10.5 and 15.0
volts DC.
• When the LED is solid red, it indicates a
battery warning condition, the battery voltage is
below 10.5 volts DC or above 15.0 volts DC.
• When the LED is blinking slowly, (once
per second), a battery shutdown has occurred.
The voltage is either below 10.0 volts DC or
above 15.5 volts DC.
• When the LED is blinking rapidly (five
times per second), a potential problem in the
DC system has been detected. Check your
batteries, battery cables and DC loads.
OVER-TEMP/OVERLOAD - Red LED
• When the LED is Off operation is
normal.
• When the LED is red, there is an over-
temp or overload condition. Check for
excessive loads or short circuit on the output
of the inverter. Correct the condition and restart
by pushing the INVERT switch.
• When the LED is blinking slowly (once
per second), an over-current condition or a
short circuit has occurred. The system has
shut OFF and will not automatically restart.
Correct the fault condition and manually restart
the system by pushing the INVERT switch.
LOW BATTERY & OVER-TEMP/OVERLOAD
- Red LEDs
When both LEDs are blinking, an AC
backfeed was detected. A backfeed occurs
when AC power from an external source is
connected to the output of the inverter. Inspect
wiring for a possible input/output wiring error.
This condition must be corrected before further
operation. A backfeed will damage the unit and
void the warranty.
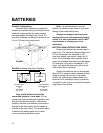
• Battery type setup. To enter the battery
type select mode, press and hold the INVERT
switch for five seconds. The status LEDs will
change from indicating status information to
OFF. Press the CHARGE switch once. One of
the four LEDs will blink rapidly, indicating the
existing battery type selection.
Battery Type Selection
Press the CHARGE switch again to
change the battery type. Continue to press until
the desired battery type is selected. If the
CHARGE switch is not pressed for five seconds,
the unit will return to normal operation and the
battery type selection will have been made.
Refer to page 20 for additional information on
battery type settings.
WET GEL 1 GEL 2 AGM
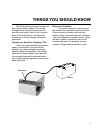
When the 12 volt input to the unit is
disconnected, the battery type setting is stored
in non-volatile memory. When the unit is
reconnected, the battery type selection
conveniently returns to the previous setting.
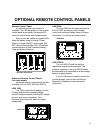
If installed with the Freedom or Link
remote control panel, the unit will be set up
and controlled from the remote. Refer to the
remote manual for more information.
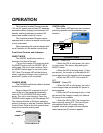
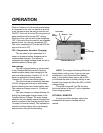
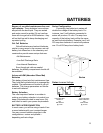
INVERT
CHARGE
REMOTE
TSC
INVERT / WET
CHARGE / GEL1
LOW BATTERY / GEL 2
OVERTEMP
OVERLOAD / AGM
Status LEDs
Front Panel