


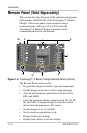


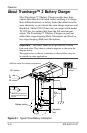

Remote Panel (Sold Separately)
975-0401-01-01 1–15
Item Description
1
ON/STANDBY Button
• Press to enable or disable the charger while AC power is
connected.
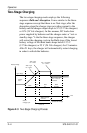
• When in Setup Mode: Press to select the Charger Mode: two or
three-stage.
• To set or cancel an Equalization program: Press and hold both the
Status and
ON/STANDBY buttons for more than five seconds.
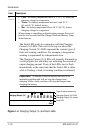
2 Charging Output (%) LEDs
• The LEDs illuminate like a bar graph displaying the present total
output charge current as a percentage of the maximum rated
charge current. For example, unit model TC4012 has a maximum
rated charge current of 40 A so at 60% the charger’s current output
is 24 A. The numbers to the left of the LEDs represent the
percentage values. See 2a on Figure 1-6 on page 1–14.
NOTE: When the maximum Charge Output current is limited by
pressing the Set Max Output button, the LEDs will still display the
total charge output current as a percentage of the maximum rated
charge current and NOT as a percentage of the limited charge
current.
• An LED may flash intermittently in combination with a solid Fault
LED to indicate a fault or with a flashing Fault LED to indicate a
warning condition. The icons on the right side of the LEDs
represent different types of faults and warnings. See 6a on Figure
1-6 on page 1–14.
3 Charger Status LEDs
Displays the present status of the charger.
• Ready - a solid light indicates that all batteries are fully charged
and in rest stage.
• Ready and Charging - solid lights indicate that batteries are fully
charged and in float stage.
• Charging - a solid light indicates that the charger is performing a
normal charge cycle.
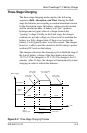
• Equalize - a solid light indicates that the charger is performing an
equalization cycle.
- a flashing light indicates that the equalization cycle
will begin after the absorption stage is done.