26
BACK
L
L
R
BACK
R
R
L
SURROUND
(
SURR
)
SPEAKERS
AC OUTLETS
AC 120V 60Hz
SWITCHED
TOTAL 120W 1A MAX.
AC
INLET
AM
ANT.
FM
ANT.
75
MULTI
CHANNEL
INPUT
RS 232
GND
FRONT
SPEAKERS
CENTER
SPEAKER
VIDEO
S VIDEO
DVD
VIDEO
5
VIDEO
4
VIDEO
3
MONITOR
OUT
VIDEO
1
VIDEO
2
OUT
IN
IN
IN
IN
IN
IN
OUT
R
L
VIDEO
S VIDEO
C
D
TAPE
2
TAPE
1
I
N
I
N
I
N
I
N
OUT
OUT
L
R
PHONO
3
2
1
3
2
5
4
1
DIGITAL
OUTPUT
(
COAXIAL
)
AC-3
RF
DIGITAL
INPUT
(
COAXIAL
)
DIGITAL
OUTPUT
(
OPTICAL
)
DIGITAL
INPUT
(
OPTICAL
)
INPUT 2
P
B
P
R
Y
INPUT 3
P
B
P
R
Y
OUTPUT
P
B
P
R
Y
COMPONENT
VIDEO
INPUT 1
P
B
P
R
Y
1
2
IR IN
MAIN ZONE 2
ZONE 2
R
L
OUT
C
FRONT
AMP
IN
R
L
SURR
BACK
SURR
PRE OUT
SUB
WOOFER
1
2
C
FRONT
AMP
IN
R
L
SURR
BACK
SURR
SUB
WOOFER
1
2
PRE OUT
AB
MODEL NO.
DTR-9.1
AV RECEIVER
12
V TRIGGER
(
6 OHMS MIN.
)
(
6 OHMS MIN.
)
BACK
L
L
R
BACK
R
R
L
SURROUND
(
SURR
)
SPEAKERS
AC OUTLETS
AC 120V 60Hz
SWITCHED
TOTAL 120W 1A MAX.
AC
INLET
AM
ANT.
FM
ANT.
75
MULTI
CHANNEL
INPUT
RS 232
GND
FRONT
SPEAKERS
CENTER
SPEAKER
VIDEO
S VIDEO
DVD
VIDEO
5
VIDEO
4
VIDEO
3
MONITOR
OUT
VIDEO
1
VIDEO
2
OUT
IN
IN
IN
IN
IN
IN
OUT
R
L
VIDEO
S VIDEO
C
D
TAPE
2
TAPE
1
I
N
I
N
I
N
I
N
OUT
OUT
L
R
PHONO
3
2
1
3
2
5
4
1
DIGITAL
OUTPUT
(
COAXIAL
)
AC-3
RF
DIGITAL
INPUT
(
COAXIAL
)
DIGITAL
OUTPUT
(
OPTICAL
)
DIGITAL
INPUT
(
OPTICAL
)
INPUT 2
P
B
P
R
Y
INPUT 3
P
B
P
R
Y
OUTPUT
P
B
P
R
Y
COMPONENT
VIDEO
INPUT 1
P
B
P
R
Y
1
2
IR IN
MAIN ZONE 2
ZONE 2
R
L
OUT
C
FRONT
AMP
IN
R
L
SURR
BACK
SURR
PRE OUT
SUB
WOOFER
1
2
C
FRONT
AMP
IN
R
L
SURR
BACK
SURR
SUB
WOOFER
1
2
PRE OUT
AB
MODEL NO.
DTR-9.1
AV RECEIVER
12
V TRIGGER
(
6 OHMS MIN.
)
(
6 OHMS MIN.
)
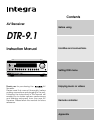
Equalizer
RLC Sw
Subwoofer
DTR-9.1
Power amplifier
Front right speaker
Front left speaker
Subwoofer
Subwoofer
Center speaker
Surround right speaker
Surround left speaker
Surround back right speaker
Surround back left speaker
DTR-9.1
Connecting a graphic equalizer and power amplifiers
Connecting a graphic equalizer
The AMP IN and the PREOUT connectors are attached
with jumper plugs. When connecting a graphic
equalizer, remove these jumper plugs before
connecting the audio connection cables.
1. Remove the jumper plugs.
2. Connect a graphic equalizer.
Notes:
• Keep the jumper plugs so that you will not lose them.
• When the connectors are not in use, replace the
jumper plugs.
Connecting power amplifiers
Using auxiliary power amplifiers allows you to listen at
louder volumes than with the DTR-9.1 alone. If power
amplifiers are used, connect each speaker to the
corresponding power amplifier.
1. Remove the jumper plugs.
2. Connect the power amplifiers.
Notes:
• Keep the jumper plugs so that you will not lose them.
• When the connectors are not in use, replace the
jumper plugs.