


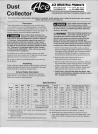
Ooeratino lnstruclions and Parts IVanual
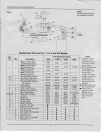
Assembly
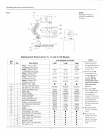
%, % and % Models
(See
Flgure 1, Page 4)
1. Assembly includes lhe lnslallation oi the a r ballle, sealng
gaskel,
discharge bag elbow, dust bag, hose and nozzle.
2. To install the air bafile irnd sealing
gaskel, place
ihe unit
upside down on a cardboard covered tlal area.
a. Atiach lhe air balfle
(13)
as shown using included bots.
b. Remove the
paper protection
from
the siicky s de of
the
gaskel (12)
and install on lhe underside of drum ld/guard
assembly
{11).
Sudace should be clean and dry belofe
3. Attach bag elbow, filier bag, hose and nozzle.
a. Place the unil right-side
up on
yoLrr
conta
ner
and attach
the discharge bag
elbow
(4)
on
the discharge ol lhe
blower as
shown
in lhe illuslration. Insert and lighten lhe
included sheet rnetal screws.
b. CLamp
the
dust bag
(9)
on
the
other end of
lhe
elbow
using the clamp enclosed
(6).
c. I\lo!nt
sheel
melal reducing
adapler
(10)
to lhe inlel
on
iop
ol drum
lid/guard
assernbly using
lhe
squeeze
lug lo
secure.
(x
HP [4odelon]y).
d. Clamp suclion hose
(7)10
reducing
adapter or
inlet wth
adjustable clarnp
(8) provided.
e. Clamp nozzle
(14)to
suction
hose wilh
camp
(8).
'1,
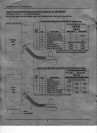
1x, 2 and 3HP Models
(See
Figure 2, Page
5)
1. Assembly
ncludes the insrallation ol lhe intake cylinder,
deflector elbow, sealing
gaskel,
discharge bag elbow, dusl
bag, hose and nozzle.
2.To insiallthe intake
cylinder, delleclor elbow and sealing
gaskel, place
lhe
unit upside do\,!n on a cardboard covered
a. The
delleclor e bow
(98)
is allached as shown by
rcmoving the two nuts nslalled
al lhe laclory,
b.
The nrake
cyLinde' {13) is dhaLhed as shown Lsirg
1/4-20
bolls supplied.
c. Bemove lhe
paper proieciion
from the slicky side of the
sealing
gaskel (11)
and install on lhe unders de of lhe
drum lld
(10).
3. Allach bag elbow, I lter
bag,
hose
and
nozzle
(excepl
3HP lVodel)'.
a. Place the unit right-slde-up
on
your
container and atlach
lhe discharce bag elbow
(3A)
on
lhe
discharge of lhe
bower as shown in the illustration.Inserl
and
ilghlen ihe
lncluded
sheel melal screws.
b. The dusl
bag s
atlached lo lhe rernovable
elbow sleeve
(3C). (This
sleeve s ips
over
lhe
end of the elbow
and is
held in
place
wilh snap'atches.) Clarnp lhe dusl bag
(8)
to lhe sleev€
(3C)
using lhe clamp
(14)
enclosed.
IMPORTANT!The
edge of lhe dust bag should be
approxirnately 1/4'below
lhe
flange
on
lhe
seeve so
that
the snap-lalches
can close complelely.
lt lhe iabrlc is too
close to
the
flange, the
snap-latch
will rest
on
ihe iabric,
and not fully rerain rhe dusl
bag.
Slip th€ 6 diameler O-ring
(38)
over the end of the
elbow
(3A)
and seat againsl lhe retainrng r b. Wilh snap
latches ln a aised
posilion,
slide the sleeve
(3C)wilh
attached bag onlo the end of the elbow wlh a slight
lwisling morion
unliltghl aga
nsl
lhe oling. snap the
latches down.
(To
remove lhe
dusl bag lor ernptying,
snap up lhe lalches and remove ihe
seeve;reinsta
las
c. l,lounl lhe
sheel
meial reduc ng
adapler
(7)
on
the inlet
elbow
(9A)
using rhe squeeze lug to
secure.
(1HP
N4odelonly).
d.
Clamp lhe suclion
hose
i5)
to the reducing adapler or
nlet elbow
using
the
adjustable clamp
(6) provided.
e. Clamp nozzle
(12)to
suclion hose wllh clamp
(6).
lnstallation
Pace lhe assembled dusi collector on rhe
correct
diameter
drum
(not
included). Plastic conlainers should nol be used
as lhey cannot support th€ weight ol lhe colleclor.
Pace X, l, and t1 HP Models on a conlainer having a diameter
ol 19[''201'-This includes 3o-gallon
galvanized garbage
cans, or 30 35
gallon
open iop sieel or liber drums. Do nol use
Place 1, 114, 2 and 3 HP Models on a conlainer having a
diameter €nge of 23" 24', such as a standard 55-gallon sle€l
or
liber
drum. Do not use
plastic
drums.
Check motor rotation on 3-phase
power
connections;lhe
cooling lan on the molor should tum clockwrse as observed
ifom
above. An electrician can coffect rolanon b?
interchanging
any two
(3-phase)
power
lead wlres.
Operation
Attach ihe dusi collector inlel hose direcly to ihe conneclor
built inlo the dust
producing
lool. lf no built- n conneclor,
poslion
a hose end mounled nozzle where t wil collecl lhe
dusl. NOTE: Check lhe recommendaion of lhe loo
manufaclurer for
the required CF[,4 air llowThe CFM lisled in
lhe specifications lor
your
collector should be
greater
than the
required
CFI!'lto ensure dusl collection, See
page
7.
Empty the
dusl collection drum when it becomes haf fult if too
lull,
all dlst
wl I
be carried into the dust bag.
'
See
page
6lor liler
bag attachment for 3HP lvodel.