


Page 15For technical questions, please call 1‑800‑444‑3353.SKU 68022
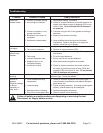
Problem Possible Causes Likely Solutions
Insufcient
fastener depth.
1. Incorrect tool depth setting.
2. Not enough air pressure.
3. Incorrect lubrication or not
enough lubrication.
4. Blocked air inlet screen (if
equipped).
5. Mechanism contaminated.
1. Adjust depth setting, if available.
2. Check for loose connections and make sure that air
supply is providing enough air pressure (PSI) to the
tool’s air inlet. Do not exceed 120 PSI maximum
air pressure.
3. Lubricate using air tool oil and grease according to
directions.
4. Clean air inlet screen of buildup.
5. Have qualied technician clean and lubricate
mechanism. Install in-line lter in air supply as
stated in Initial Set Up: Air Supply.
Fasteners drive
too deeply.
1. Incorrect tool depth setting.
2. Too much air pressure.
1. Adjust depth setting, if available.
2. Reduce air supply pressure (PSI).
Tool cycles
without ring
fastener.
1. Jammed fastener.
2. Tool empty.
3. Incorrect fasteners used.
4. Magazine dirty or not
lubricated properly.
5. Insufcient air ow.
1. Clear jammed fastener according to Clearing Jams
instructions.
2. Fill with correct fasteners.
3. Empty, then ll with correct fasteners.
4. Clean and lubricate magazine and pusher.
5. Check for loose connections and make sure that
air supply is providing enough air ow (CFM) and
pressure (PSI) to the tool’s air inlet. Do not exceed
120 PSI maximum air pressure.
Frequent
jamming.
Incorrect fastener type. Conrm fastener diameter, type, length, angle, and
collation type. Correct as needed.
Severe air
leakage.
(Slight air leakage
is normal,
especially on
older tools.)
1. Cross-threaded housing
components.
2. Loose housing.
3. Damaged valve or housing.
4. Dirty, worn or damaged valve.
1. Check for incorrect alignment and uneven gaps. If
cross-threaded, disassemble and replace damaged
parts before use.
2. Tighten housing assembly. If housing cannot tighten
properly, internal parts may be misaligned.
3. Replace damaged components.
4. Clean or replace valve assembly.
Follow all safety precautions whenever diagnosing or servicing the tool.
Disconnect air supply before service.
Troubleshooting