


4
from left to right. The center position of the bar locks-off the tool. Be
sure to release the trigger when changing the position of the
forward/reverse bar.
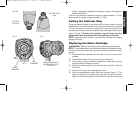
SWITCH
To turn the tool on, squeeze the trigger switch. When the tool reaches
its set torque level, the spindle will stop and the LED light on the back
of the tool will illuminate. Do not continually squeeze and release the
trigger when driving a joint; let the tool stop automatically.
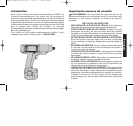
Adjusting Torque Level
WARNING: Remove the battery before making any adjustments.
1) Insert a 1/4" hex key into the spindle and turn it for one rotation.
You may hear a click, indicating the clutch is coupled.
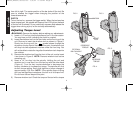
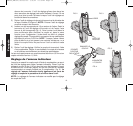
2) Insert the wireform tool into the two holes on the front ring of the
unit. Be sure to insert the wireform tool as shown in Figure 2.
Slowly turn the ring until the symbol shows through the
window on the top front of the tool. At this point, the wireform tool
will drop into two adjustment notches under the front ring. You
will not be able to rotate the ring after the wireform tool drops into
the notches.
3) Remove the wireform tool from the front of the unit, and re-insert
it as shown in Figure 3. NOTE: Remove wireform tool before
operating unit.
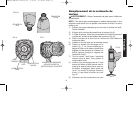
4) Insert a 1/4" hex key into the spindle. Holding the unit and
wireform tool in one hand, turn the hex key with the other hand
(Figure 4). Turn the key counterclockwise to decrease the
torque, clockwise to increase the torque. The spindle will click
at each torque setting. Each click signifies a torque change of
approximately 0.08 N-m. NOTE: If the spindle stops clicking
and you feel significant resistance, the tool is at its torque limit.
Do not force the tool beyond this point.
5) Remove wireform tool. Check the torque of the tool with a torque
English
FIG. 2 FIG. 3
FIG. 4
FIG. 5
DECREASE
TORQUE
OPTIONAL
BALE HANDLE
WINDOW
ADJUST
TOOL
INCREASE
TORQUE
DW900,DW901/383609 bc 5/8/02 2:59 PM Page 4