


meter. If necessary, readjust the torque up or down, following the
above instructions.
This tool can achieve a maximum torque of approximately. 4.5 N-m
and a minimum torque of approximately 1.5 N-m.
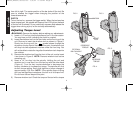
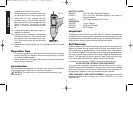
Setting the Indicator Ring
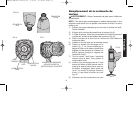
Once the desired torque is confirmed with a torque meter, use the
wireform tool to set the indicator ring. Place the wireform tool about
1/4" into the holes on the front ring and turn the front ring until the
numbers on the ring match the torque setting indicated by the torque
meter (Figure 5).Setting the indicator ring will also seal the
adjustment holes and prevent dirt from getting into the tool.
NOTE: Adjusting the indicator ring does not change the torque
setting of the tool.
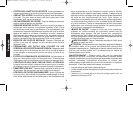
Replacing the Motor Cartridge
WARNING: Remove the battery before performing any service.
NOTE: To avoid damage to the electronic module, this operation must
be performed while wearing a grounding strap attached to earth
ground.
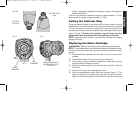
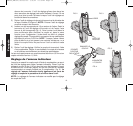
1) Remove the four fasteners on the back of the tool; remove the
endcap.
2) Remove the rubber O-ring from the motor (Figure 6).
3) Using pliers, remove the motor leadwires, noting color coding
and connection scheme (Figure 6).
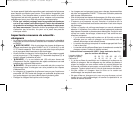
4) Grasp the motor and pull it out from the rear of the unit. Discard
the motor.
5) Install the O-ring on the replacement motor.
6) Align the replacement motor with the housing (Figure 7). The
groove formed by the sheet metal ring over the motor should
align with the ribs located on the interior of the left housing (as
5
English
Nm
in-lbs
2.8
in-lbs
Nm
30
SETTING
FOR N-m
SETTING FOR
in-lbs
FIG. 5A
FIG. 6 FIG. 7
O-RING
BLACK
LEADWIRE
RED
LEADWIRE
ALIGN GROOVES TO
GUIDE MOTOR INTO
HOUSING
LED
DW900,DW901/383609 bc 5/8/02 2:59 PM Page 5