


11
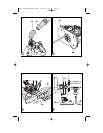
USING A STRAIGHT EDGE AS A GUIDE (FIG. J)
WARNING: Turn the router off and disconnect it from the power supply.
When it is not possible to use the edge guide, for example when routing grooves in the
back panel of a bookcase to support shelves, proceed as follows:
• Place a straight edge onto the workpiece.
• Move the straight edge until it is in the correct position to guide the tool.
• Securely clamp the straight edge to the workpiece.
USING THE TEMPLATE GUIDE (FIG. D)
WARNING: Turn the router off and disconnect it from the power supply.
• Secure the template over the workpiece with double-sided tape or clamps.
• The router bit must extend below the flange of the template guide, to cut the workpiece in
the shape of the template.
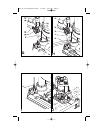
USING THE CENTERING PIN (FIG. E)
WARNING:Turn the router off and disconnect it from the power supply.
The centering pin can be used to cut out circular patterns.
• Drill a hole for the point of the centering pin in the center of the circle to be cut.
• Place the router on the workpiece with the point of the centering pin in the drilled hole.
• Adjust the radius of the circle with the bars of the edge guide.
• The router can now be moved over the workpiece to cut out the circle.
SWITCHING ON AND OFF
Switching on
• Press the on/off trigger switch (1).
Switching off
• Release the on/off trigger switch.
Continuous operation
• To lock the switch on for continuous operation, squeeze the trigger (1) and hold while you
depress the lock button (2). Hold the button in while you release the trigger and the tool
will continue to run. To turn the tool off, squeeze and release trigger.
WARNING: To reduce the risk of injury and prevent loss of control, always
operate the router with both hands.
USING THE ROUTER
• Make sure that the material to be cut is clamped down and is stable enough to support
the router during operation.
• Use both hands on the handles to control the router.
• Move the router counterclockwise when cutting outside edges. Move clockwise when
cutting inside edges. See Figure K.
• Always hold router from the front insuring that the chip shield is between the user and the
bit.
• After setting the cutting depth as described, locate the router such that the bit is directly
over the place you will be cutting. With the router running, lower the unit smoothly down
into the workpiece. (DO NOT FORCE THE ROUTER DOWN.) When the tool reaches
the pre-set depth, tighten the plunge release lever. When you have finished routing,
loosen the plunge release lever and let the spring lift the router directly out of the
workpiece.
NOTE: Always feed the router opposite to the direction in which the cutter is rotating.
FEEDING SPEED AND RATE OF CUT
• Variation between materials and bit configurations dictates a wide variety of feed rates.
Experience is the best measure for determining feed rate. Become familiar with the
sound and feel of the router by making practice cuts in scrap material. Make a
preliminary adjustment of the speed control, selecting a higher speed for smaller
diameter bits and a lower speed for larger diameter bits.
The router bit rotates at a very high speed and may heat up if the router is moved too
slowly through the wood and may cause burn marks. Feeding the router too fast or trying
to remove too much material in a single pass will overload the motor. Use two or more
passes for extra-large cuts (over 1/8" deep), especially in hard woods.
492777-00 FS1200RP Router 2/6/06 1:02 PM Page 11