14
If you have any questions, call 1-800-54-HOW-TO
INSIDE CORNER:
Left side
1. Miter right at 45°
2. Save the right side of cut
Right side
1. Miter left at 45°
2. Save left side of cut
OUTSIDE CORNER:
Left side
1. Miter left at 45°
2. Save the right side of cut
Right side
1. Miter right at 45°
2. Save left side of cut
ALWAYS MAKE DRY RUNS TO CHECK FOR CLEARANCE AND
CORRECTNESS OF CUTS.
SPECIAL CUTS
NEVER MAKE ANY CUTS UNLESS THE MATERIAL IS SECURED
ON THE TABLE AND AGAINST THE FENCE.
ALUMINUM CUTTING (CARBIDE TIPPED BLADE ONLY)
Aluminum extrusions such as those used when making aluminum
screens and storm windows can easily be cut with your saw using the
proper blade designed for non-ferrous metal cutting. Position the
material so that you will be cutting the thinnest cross section, as
shown in Figure 12. Figure 13 illustrates the wrong way to cut these
extrusions. Use a wax lubricant when cutting aluminum such as
Johnson’s Stick Wax No.140. Apply the stick wax directly to the saw
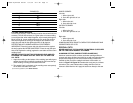
- EXAMPLES -
NO. SIDES ANGLE MITER
445°
536°
630°
7 25.7°
8 22.5°
920°
10 18°
CUTTING CROWN MOLDING
In order to fit properly, crown molding must be mitered with extreme
accuracy. The two flat surfaces on a given piece of crown molding
are at angles that, when added together, equal exactly 90 degrees.
Most, but not all, crown molding has a top rear angle (the section
that fits flat against the ceiling) of 52 degrees and a bottom rear
angle (the part that fits flat against the wall) of 38 degrees.
PRETESTING WITH SCRAP MATERIAL IS EXTREMELY
IMPORTANT! Place the bottom side (the side that will be against
the wall) against the MITER SAW FENCE. Place the top (that part
that will be against the ceiling) against the saw table and the crown
molding fence.
INSTRUCTIONS FOR CUTTING CROWN MOLDING ANGLED
BETWEEN THE FENCE AND THE TABLE OF THE SAW FOR
ALL CUTS:
1. Angle the molding so the bottom of the molding (part which goes
against the wall when installed) is against the fence and the top
of the molding is resting on the table of the saw.
2. The angled “flats” on the back of the molding must rest squarely
on the fence and table of the saw.
630669-00,BT1000 manual 2/15/05 8:11 AM Page 14


