


9
0 3 I N S TALLING YOUR METER SENSOR
TYPE 1—ELECT R O M E C H A N I C A L
8
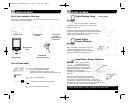
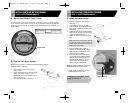
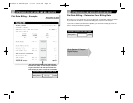
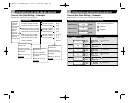
A . Record Your Meter’s Power F a c t o r
Find your meter’s Power Factor on the face of the meter. Look for a number preceded
by the letters Kh. This number is usually 7.2 for an electromechanical meter. Write this
number in the box below.You will need it later (in section 06) when you program your
Digital Display.
Power Factor = (usually 7.2 Kh)
Power Factor
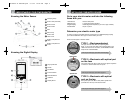
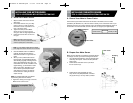
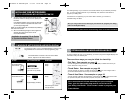
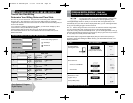
C . Install Your Meter Sensor
1. Wipe the meter dome clean with the
damp cloth.
2 . Fit the Meter Sensor over your utility
m e ter as shown, so that the Sensor Head
sits as close as possible to the front of the
glass dome.
3 . Ti g h ten the clamping strap until the Mete r
Sensor is snu g, but can move just enough
to allow for slight adjustments.
4 . Position the Sensor A rm as shown to the
ri g h t .
N o t e : The Sensor A rm must be in line with
the disc (use the line of the Sensor A r m as
a re fe rence) and the Sensor LEDs must be
c e n t e red from side-to - s i d e .
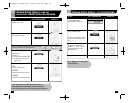
5 . Press the RESET bu tto n . Within 10
s e c o n d s , the STATUS indicator will light
solid red while the Meter Sensor looks
for a signal from the mete r.
6 . When you have positioned the sensor
a rm corre c t ly, the red STATUS indicato r
will flash whenever the bl a c k stripe on
the meter wheel passes by. You may
need to wait for seve r al revo l u t i o n s
b e f o re seeing the indicator fl a s h .
N OT E : To maximize batte ry life, the indicato r
s t ops flashing after about two minu t e s .
7. Ti g h t en the clamp just enough so that
the Meter Sensor cannot move.
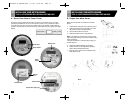
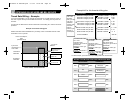
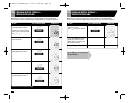
B . Prepare Your Meter Sensor
Make sure the batteries are installed in the Meter Sensor (and the
STATUS Indicator is flashing).
1. Open the Sensor Arm Latch Cover by
pulling upward.
2. Extend the Sensor Arm to its full length by
pulling on it gently, but firmly. If you
accidentally pull it out completely, push it
back into the casing.
3. Close the Sensor Arm Latch Cover.
0 3 I N S TALLING YOUR METER SENSOR
TYPE 1—ELECT R O M E C H A N I C A L
Status Indicator
I n s t allation is complete! Go to
page 16 Section 4.
Reset Button
90539499 01 EM100B.qxd 7/7/08 10:05 AM Page 8