


MOTOR
Be sure your power supply agrees with nameplate marking. Lower voltage will cause loss of power and can result in
over-heating. All Black & Decker tools are factory-tested; if this tool does not operate, check the power supply.
SANDING
L
EAD BASED PAINT
Sanding of lead based paint is NOT RECOMMENDED due to the difficulty of controlling the contaminated dust. The
greatest danger of lead poisoning is to children and pregnant women. Since it is difficult to identify whether or not a
paint contains lead without a chemical analysis, we recommend the following precautions when sanding any paint:
P
ERSONAL SAFETY
• No children or pregnant women should enter the work area where the paint sanding is being done until all clean up is
completed.
• A dust mask or respirator should be worn by all persons entering the work area. The filter should be replaced daily or
whenever the wearer has difficulty breathing.
NOTE: Only those dust masks suitable for working with lead paint dust and fumes should be used. Ordinary painting
masks do not offer this protection. See your local hardware dealer for the proper (NIOSH approved) mask.
• NO EATING, DRINKING or SMOKING should be done in the work area to prevent ingesting contaminated paint
particles.Workers should wash and clean up BEFORE eating, drinking or smoking. Articles of food, drink, or smoking
should not be left in the work area where dust would settle on them.
ENVIRONMENTAL SAFETY
• Paint should be removed in such a manner as to minimize the amount of dust generated.
• Areas where paint removal is occurring should be sealed with plastic sheeting of 4 mils thickness.
• Sanding should be done in a manner to reduce tracking of paint dust outside the work area.
CLEANING AND DISPOSAL
• All surfaces in the work area should be vacuumed and thoroughly cleaned daily for the duration of the sanding
project.Vacuum filter bags should be changed frequently.
• Plastic drop cloths should be gathered up and disposed of along with any dust chips or other removal debris.They
should be placed in sealed refuse receptacles and disposed of through regular trash pick-up procedures. During
clean up, children and pregnant women should be kept away from the immediate work area.
• All toys, washable furniture and utensils used by children should be washed thoroughly before being used again.
ASSEMBLY
WARNING: To reduce the risk of injury, make sure that the tool is switched off and unplugged before
performing any of the following assembly.
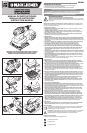
FITTING SANDING SHEETS (FIG. B )
• Soften the sanding sheet by rubbing its non-abrasive side over the edge of a work table.
• Press the paper clamp levers (6) upwards to release them from the retaining grooves and open the paper clamps by
pressing them down.
• Place the sheet onto the sanding base.
• Insert the edge of the sanding sheet into the front paper clamp as shown.
• Press the front paper clamp lever (6) downwards and locate it in the retaining groove.
• While keeping a slight tension on the sheet, insert the rear edge of the sheet into the rear paper clamp.
• Press the rear paper clamp lever (6) downwards and locate it in the retaining groove.
PUNCHING SANDING SHEETS (FIG. C)
The paper punch (7) is used for punching dust extraction holes in sanding sheets without pre-punched holes.
Fit a sanding sheet.
• Hold the tool in position right above the paper punch (7).
• Press the tool with the sanding base (5) down into the paper punch.
• Take the tool off the paper punch (7) and check whether the holes in the sanding sheet have been fully pierced.
FITTING AND REMOVING THE DUST CANISTER (FIG. D)
• Fit the dust canister (3) over the dust extraction outlet (4).
• To remove the dust canister (3), pull the dust canister to the rear and off the outlet (4).
ASSEMBLING AND FITTING THE SHAVINGS COLLECTION BAG (FIG. E)
The shavings collection bag is particularly useful when working in confined spaces. Before first use, you will have
to assemble the shavings collection bag.
• Fit the wire frames (14) to the connecting plate (15) using the screws (16) and washers (17).
• Pull the cloth bag (18) over the frame structure as shown.
• Take care that the bag opening (19) is well fitted around the edge of the connecting plate (15).
• Slide the connecting plate over the shavings discharge outlet (3).
OPERATION
WARNING: To reduce the risk of injury, let the tool work at its own pace. Do not overload.
SWITCHING ON AND OFF (FIG. E)
• To switch the tool on, press the part of the on/off switch (1) marked 'I'.
• To switch the tool off, press the part of the on/off switch (1) marked '0'.
EMPTYING THE DUST CANISTER (FIG. D)
• The dust canister should be emptied every 10 minutes.
• Pull the dust canister (3) to the rear and off the tool .
• Remove the cover (2) by twisting it counterclockwise.
• Hold dust canister with the filter (8) facing down and shake the canister (3) to empty the contents.
• Shake the cover (2) to empty the contents.
• Refit the cover (2) onto the dust canister (3), twisting it clockwise until it locks into place.
• Fit the dust canister (3) onto the tool.
CLEANING THE DUST CANISTER FILTER
WARNING: To reduce the risk of personal injury, do not use compressed air to clean the filter.
NOTE: Do not use a brush or sharp objects to clean the filter as these items can reduce the durability of the filter
material. Do not wash the filter.
• The dust canister filter (8) is re-usable and should be cleaned regularly.
• Empty the dust canister (3) as described above.
• Pull the dust canister filter (8) off the dust canister (3).
• Shake off the excess dust by tapping the filter (8) into a trash can.
• Replace the dust canister filter (8).
• Fit the cover (2).
• Fit the dust canister (3) onto the tool.
HINTS FOR OPTIMUM USE
• Do not place your hands over the ventilation slots.
• Do not exert too much pressure on the tool.
• Regularly check the condition of the sanding sheet. Replace when necessary.
• Always sand with the grain of the wood.
• When sanding new layers of paint before applying another layer, use extra fine grit.
• On very uneven surfaces, or when removing layers of paint, start with a coarse grit. On other surfaces, start with a
medium grit. In both cases, gradually change to a fine grit for a smooth finish.
DUST COLLECTION
WARNING: Fire hazard. Collected sanding dust from sanding surface coatings (polyurethane, linseed oil, etc.) can
self-ignite in sander dust canister or elsewhere and cause fire. To reduce risk, empty canister frequently and strictly
follow sander manual and coating manufacturer's instructions.
WARNING: Fire hazard.When working on metal surfaces, do not use the dust canister or a vacuum cleaner because
sparks are generated.Wear safety glasses and a dustmask. Due to the danger of fire, do not use your sander to sand
magnesium surfaces. Do not use for wet sanding.
MAINTENANCE
Use only mild soap and damp cloth to clean the tool. Never let any liquid get inside the tool; never immerse any part of
the tool into a liquid.
IMPORTANT:To assure product SAFETY and RELIABILITY, repairs, maintenance and adjustment should be performed
by authorized service centers or other qualified service organizations, always using identical replacement parts.
WARNING: The use of any accessory not recommended for use with this tool could be hazardous.
P
ROTECTING THE ENVIRONMENT
Separate collection.
This product must not be disposed of with normal household waste.
Should you find one day that your Black & Decker product needs replacement, or if it is of no further use to you, do not
dispose of it with household waste. Make this product available for separate collection.
Separate collection of used products and packaging allows materials to be recycled and used again.
Re-use of recycled materials helps prevent environmental pollution and reduces the demand for raw
materials.
Local regulations may provide for separate collection of electrical products from the household, at municipal waste sites
or by the retailer when you purchase a new product.
S
ERVICE INFORMATION
Black & Decker offers a full network of company-owned and authorized service locations. All Black & Decker Service
Centers are staffed with trained personnel to provide customers with efficient and reliable power tool service.
Whether you need technical advice, repair, or genuine factory replacement parts, contact the Black & Decker location
nearest you.
T
ROUBLESHOOTING
Problem Possible Cause Possible Solution
• Unit will not start. • Cord not plugged in. • Plug tool into a working
outlet.
• Circuit fuse is blown. • Replace circuit fuse.
(If the product
repeatedly causes the
circuit fuse to blow,
discontinue use
immediately and have it
serviced at a
Black & Decker service
center or authorized
servicer.)
• Circuit breaker is tripped. • Reset circuit breaker.
(If the product
repeatedly causes the
circuit breaker to trip,
discontinue use
immediately and have it
serviced at a
Black & Decker service
center or authorized
servicer.)
• Cord or switch is damaged. • Have cord or switch
replaced at
Black & Decker Service
Center or Authorized
Servicer.
SPECIFICATIONS
Voltage
AR 220V ~ 50Hz
B2C 220V ~ 50-60Hz
B3 120V ~ 60Hz
B2 220V ~ 60Hz
BR 127V ~ 60Hz
Power
AR, B2C, B2, BR 200W
B3 230W
Orbits per Minute (OPM)
AR, B2C, B2, BR 13800
B3 14500
ENGLISHENGLISH