


-8-
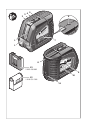
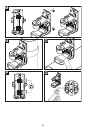
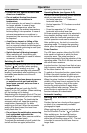
The numbering of the product features shown
refers to the illustration of the tool on the
graphic page.
1 Exit opening for laser beam
2 Pulse-function indicator
3 Pulse-function button
4 Operating mode button
5 Battery indication
6 Tripod mount 1/4"
7 On/Off switch
8 Battery lid
9 Serial number
10 Laser warning label
11 Latch of ba
ttery lid
12 Belt Pouch*
13 Case*
14 Laser viewing glasses*
15 Measurement plate with stand*
16 Laser Receiver*
17 Positioning Device
18 Telescoping Pole System
*The accessories illustrated or described are
not included as standard delivery.
Features
Working range
– Standard . . . . . . . . . . . . . . . . . .65 ft (20m)
– With laser receiver . . . . . . . . .165 ft (50m)
Levelling Accuracy:
Minimum
Factory Accuracy . . . . . . . . . . . .(±0.3mm/m)
. . . . . . . . . . . . . . . . . . . . .± .0036in/ft
Typical Accuracy . . . . . . . up to 1/4 at 100ft
Self-levelling range,
typically . . . . . . . . . . . . . . . . . . . . . . . . . ±4°
Levelling duration,
typically . . . . . . . . . . . . . . . . . . . . . . . . .<4s
Operating temperature . . . . . . .14° F 122° F
. . . . . . . . . . . . . . . . . .(–10° C+50° C)
Storage temperature . . . . . . . . .-4° F 158°F
. . . . . . . . . . . . . . . . . .(–20°C +70° C)
Relative air humidity,
max. . . . . . . . . . . . . . . . . . . . . . . . . . .90 %
Laser class . . . . . . . . . . . . . . . . . . . . . . 2
Laser type . . . . . . . . . . . . . . .635 nm, <1mW
C6 . . . . . . . . . . . . . . . . . . . . . . . . . >3.33
Tripod mou
nt . . . . . . . . . . . . . . . . . . .1/4-20
Batteries . . . . . . . . . . . . .3 x 1.5 V LR6 (AA)
Operating lifetime, approx. . . . . . . . . . . .12 h
Automatic switch-off after approx. . . .30 min
Weight according to EPTA-Procedure
01/2003 . . . . . . . . . . . . . . . . 1lb (0.45kg)
Dimensions . . . . . . . .4-5/8” x 2-1/4” x 3-1/2”
. . . . . . . . . . . . . . . (118x 57 x 89mm)
Degree of protection . . . . . . . . . . . . .IP 54
(dust and splash water protected)
Please observe the article number on the
type plate of your tool. The trade names of
the individual tools may vary.
The tool can be clearly identified with the
seri
al number 9 on the type plate.
Technical Data
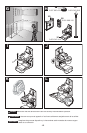
Preparation
Inserting/Replacing the Battery
Use only alkaline batteries.
To open the battery lid 8, press the latch of
the battery lid 11 in the direction of the arrow
and remove the battery lid. Insert the
supplied batteries.
When inserting, pay attention to the correct
polarity according to the representation on
the inside of the battery compartment.
When the battery indication 5 flashes red, the
batteries must be replaced.
Always replace all batteries at the same time.
Only use batteries from one brand and with
the identical capacity.
• Remove the batteries from the
tool when not using it for extended
periods. When storing for extended
periods, the batteries can corrode and
discharge themselves.
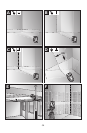
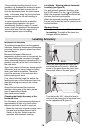
The tool is intended for determining and checking horizontal and vertical lines.
Intended Use