


-9-
Initial Operation
• Protect the tool against moisture and
direct sun irradiation.
• Do not subject the tool to extreme
temperatures or variations in
temperature.
As an example, do not leave it in vehicles
for longer periods. In case of large
variations in temperature, allow the
tool to adjust to the ambient temperature
before putting it into operation. In case of
extreme temperatures or variations in
temperature, the accuracy of the tool can
be impaired.
• Avoid heavy impact or falling of the
tool. After heavy exterior impact on the
tool, an accura
cy check should always be
carried out before continuing to work (see
“Leveling Accuracy”).
• Switch the tool off during transport.
When switching off, the leveling unit,
which can be damaged in case of intense
movement, is locked.
Switching On and Off
To switch on the tool, push the On/Off switch
7 to the “ on” position (when working
without automatic leveling) or to the “
on” position (when working with automatic
leveling). Immediately after switching on, the
tool sends laser beams out of the exit
openings 1.
• Do not point the laser beam at persons
or animals and do not look into the
laser beam yourself, not even from a
large distance.
To switch off the tool, push the On/Off
switch 7 to the “off” position. When switching
off, the leveling unit is locked.
Deactivating the Automatic Shut-off The tool
switches off automatically after a
n operating
duration of 30 minutes. To deactivate the
automatic switch-off, keep the operating
mode button 4 pressed for 3 s while
switching on the tool. When the automatic
switch-off is deactivated, the laser lines
briefly flash after 3 s.
• Do not leave the switched on measuring
tool unattended and switch the
tool off after use. Other persons could be
blinded by the laser beam.
To activate the automatic shut-off, switch the
tool off and then on again (without the
operating mode button 4 pushed).
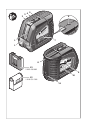
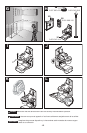
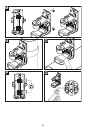
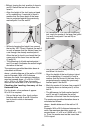
Operating Modes (see figures A–D)
The tool has three operating modes between
which you can switch at any time:
– Horizontal operation “–”: Produces a
horizontal laser line,
– Vertical operation “l”: Produces a vertical
laser line,
– Cross-line operation “+”: Produces a
horizontal and vertical laser line.
All three operating modes can be selected in
the automatic leveling mode. In the locked
mode, either the horizontal operation or the
vertic
al operation mode can be selected.
After switching on, the tool is in cross-line
operating mode. To change the operating
mode, press the operating mode button 4.
Pulse Function
The LR2 laser receiver allows the GLL2-50
to be used in situations in which the lines
cannot be seen. The pulse function is
activated separately from the selection of the
operating mode. The GLL2-50 does not work
with other laser receivers.
In pulse function, the laser lines flash
at very
high frequency and thus become detectable
for the laser receiver 16.
To switch on the pulse function, press button
3. When the pulse function is switched on,
the pulse-function indicator 2 lights up green.
When the pulse function is switched on, the
visibility of the laser lines is reduced for the
human eye. Therefore, shut off the pulse
function by pus
hing button 3 again when
working without laser receiver. When the
pulse function is switched off, the pulse-
function indicator 2 is deactivated.
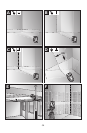
Automatic Leveling
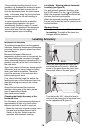
Working with Automatic Leveling (see
figure C)
Position the tool on a level and firm support
or attach it to a commercially available
photographic tripod.
When working with automatic leveling, push
the On/Off switch 7 to the “ on” position.
After switching on, the leveling function
automatically compensates irregularities
within the self-leveling range of ±4°. The tool
is levelled in as soon as the laser lines no
longer flash.
Operation