


-7-
INSTALLING
SDS-plus
®
ACCESSORIES
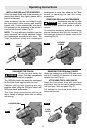
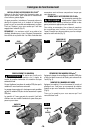
Clean the insert shank end of the accessory to
remove any debris, then lightly grease with a
light oil or lubricant
Insert accessory into the tool holder through
the dust shield, while twisting and pushing
inward until it locks automatically into place.
Pull outward on the accessory to be certain it
is locked into the tool holder (Fig. 2).
NOTE: The high efficiency available from the
rotary hammers can only be obtained if sharp
and undamaged accessories are used. The
"cost" to maintain sharp and undamaged
accessories is more than offset by the "time
saved" in operating the tool with sharp
accessories.
REMOVING SDS-plus
®
ACCESSORIES
Accessories may be hot after
use. Avoid contact with skin
and use proper protective gloves or cloth to
remove.
To remove an accessory, pull and hold locking
sleeve backward and pull bit forward. All
accessories should be wiped clean after
removing (Fig. 3).
Operating Instructions
CHANGING THE CHUCK
Do not carry the tool by the
chuck. Tool may unexpectedly
fall if the chuck is not fully engaged.
The SDS-plus chuck can easily be exchanged
for the 3-jaw chuck supplied with you tool.
Hammer drilling and chiseling are only
possible when using the SDS-plus chuck with
SDS-plus shank accessories.
The 3-jaw chuck converts your tool for use
with a variety of straight shank bits for drilling
and driving.
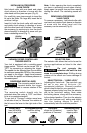
REMOVING THE SDS-plus
®
CHUCK
Grasp the locking ring of the SDS-plus chuck
and pull forcefully in direction of arrow and
remove from tool (Fig. 4).
ATTACHING THE 3-JAW CHUCK
Grasp the 3-jaw chuck firmly with your hand
and push it onto the tool with a twisting motion
until you hear it lock into place (Fig. 5).
Pull outward on the chuck to be certain it is
locked into the tool.
FIG. 2
FIG. 3
FIG. 4
FIG. 5
LOCKING RING
3-JAW
CHUCK
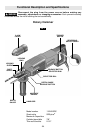
DUST
SHIELD
LOCKING
SLEEVE
!
WARNING
!
WARNING