


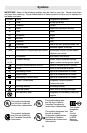
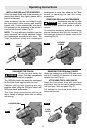
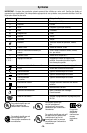
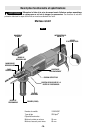

Drilling only: Drilling/hammering: Vario-lock Hammering only:
used for drilling used for drilling allows for 36 desired used for light
wood, steel, etc. concrete positions of “hammer” chipping work
-
8
-
VARIABLE SPEED CONTROLLED
TRIGGER SWITCH
Your tool is equipped with a variable speed
trigger switch. The tool can be turned "ON" or
"OFF" by squeezing or releasing the trigger.
The speed can be adjusted from the minimum
to maximum nameplate RPM by the pressure
you apply to the trigger. Apply more pressure
to increase the speed and release pressure to
decrease speed.
REVERSING SWITCH LEVER
The reversing switch lever is
located above the trigger
switch and is used to reverse rotation of the
bit.
The reversing switch should only be
activated when the motor is "OFF" and when
bit is at a complete standstill.
To use tool in "Forward" rotation move lever
to left side of tool, to "Reverse" the rotation of
the bit move the lever to the right side of the
tool.
SELECTOR DIAL
The selector dial allows the tool to be set for
various applications as listed in the chart
(Fig. 8).
Do not operate the
selection dial until the tool
come to a complete stop.
Shifting during
rotation of the chuck can cause damage to
the tool.
SELECTOR DIAL - “VARIO-LOCK”
Adjusting the Vario-Lock: The vario-lock can
be set in any one of thirty-six (10˚
increments) positions. Choose a position
which is best suited for your operation.
Depress release button and turn the selector
dial, to the “vario-lock” setting. Next, rotate
the locking sleeve, along with the accessory,
to the desired position. Then turn the selector
dial to the “hammer only” setting and slightly
turn the locking sleeve to have it
automatically lock into a definite position.
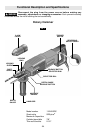
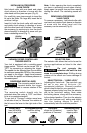
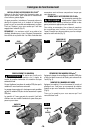
INSTALLING ACCESSORIES
3-JAW CHUCK
Hold chuck collar with one hand and rotate
chuck sleeve in direction of arrow with the
other hand until the jaws are open (Fig. 6).
For small bits, open jaws enough to insert the
bit up to the flutes. For large bits, insert the bit
as far as it will go.
Insert bit, hold the chuck collar with one hand
and rotate chuck sleeve in direction of arrow
with the other hand until it latches. Then clamp
the accessory by continuing to turn the chuck
sleeve forcefully in direction of arrow until you
hear a ratcheting sound (Fig. 7).
Note: If after opening the chuck completely
you hear a ratcheting sound when closing,
simply open it a quarter turn and then resume
closing the chuck. The ratcheting sound will
stop.
REMOVING ACCESSORIES
3-JAW CHUCK
To remove a accessory, hold chuck collar with
one hand and rotate chuck sleeve in direction
of arrow with the other hand until the
accessory can be removed (Fig. 6).
FIG. 7FIG. 6
FIG. 8
CHUCK
COLLAR
CHUCK
SLEEVE
CHUCK
COLLAR
CHUCK
SLEEVE
!
CAUTION
!
CAUTION