


-9-
SLIP CLUTCH
The tool has a internal pre-set slip clutch.
The output spindle will stop rotating if the
accessory binds and overloads the tool.
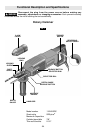
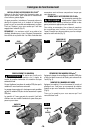
AUXILIARY HANDLE
The tool must be supported with the auxiliary
handle, which can be swiveled 360˚. To
reposition and/or swivel the handle, loosen
the hand grip, move the handle to the
desired position along the barrel and
securely retighten the hand grip.
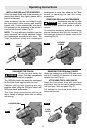
DEPTH GAUGE
Your drilling depth can be pre-set and/or
repeated by using the depth gauge.
Setting depth: After the auxiliary handle is
installed, make sure the accessory has been
fully inserted into the tool holder before
setting the depth gauge (Fig. 1).
To adjust depth, push the depth gauge
release button, slide the depth gauge to
desired depth and release pressure on
button to lock the depth gauge in place.
TOOL TIPS
Following a few simple tips will reduce wear
on the tool and the chance of injury to the
operator.
The high efficiency available from the
BOSCH Rotary Hammer can only be
obtained if sharp and undamaged drilling
tools are used. Note that the costs for
maintaining sharp drilling tools are more than
offset by the time lost in operating dull drilling
tools.
All grease packed hammers require a short
time to warm up. Depending on the
temperature, this time will vary from
approximately 15 seconds (90° F) to 2
minutes (32° F). The tool will exert its full
power and hammering action after the heat
from impact hammering has spread,
softening the grease.
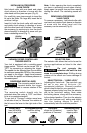
CARBIDE TIPPED BITS
Used for drilling stone, concrete, cement,
brick, cinder block and other unusually hard
non-metals. The Rotary Hammer is designed
for “SDS” Carbide Tipped Bits up to 3/4 inch
diameter.
3 JAW CHUCK
The 3 Jaw Chuck can convert your tool for
use with straight shank bits.
You will extend the life of your bits and do
neater work if you always put the bit in contact
with the workpiece BEFORE pulling the
trigger. During operation, hold the drill firmly
and exert moderate, steady pressure. Too
much pressure at low speed will stall the
hammer. Too little pressure will keep the bit
from cutting and cause excess friction by
sliding over the surface. This can be
damaging to the drill and bit.
Shanks of all drill bits should be wiped clean
prior to using and immediately after removing.
RECALL THESE INSTRUCTIONS FOR
SAFE OPERATION:
1. Some materials require slow drilling
speeds; whereas, others require higher speed
to produce the best results.
2. All work must be supported or secured
before drilling and steady, even pressure
applied in line with the drill bit.
3. As the drill bit cuts through the opposite
side, reduce the pressure and continue
running the drill as the bit is withdrawn.
Materials such as glass, porcelain, ceramics,
tiles, plastics, etc., should be drilled at low
speeds with specially designed drill bits and
lubricants.
DRILLING WOOD OR PLASTIC
If backing block is not used, ease up on the
pressure just before the bit breaks through
the wood to avoid splintering. Complete the
hole from the opposite side immediately after
the point breaks through. If bit binds, reverse
the drilling operation to help remove the bit
from the work.
DRILLING METAL
Make a center punch in the material for
easier starting. Use enough pressure to keep
the bit cutting. If the bit is allowed to merely
spin in the hole, it will become dull within a
short time. When drilling a larger hole, it is
faster and easier on your power pack to first
make a smaller hole and enlarge it to the
required size. Lubricate the tip of the bit
occasionally with CUTTING OIL for easier
metal drilling. If bit binds, reverse the drilling
to help remove the bit from the work.
DRILLING MASONRY
Use carbide-tipped SDS-plus
®
bit for cinder
block, mortar, common brick, soft stone and
other materials. The amount of pressure to
be used is dependent upon the type of
material being drilled. Soft materials require
less pressure while the hard materials need
more pressure to prevent the drill bit from
spinning.