


-7-
Operating Instructions
Assembly
CHANGING THE BLADE
Always unplug the tool from the power source
before changing accessories or making any
adjustments.
The blade should not be reground.
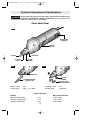
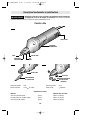
1. Push the blade pin far enough to the right or
left so you will be able to pull the blade pin out
of the shear head (Fig. 2).
2. Pull blade forward out of the shear head.
3. Lightly grease the blade pin and the new
blade, and insert the blade into the head of the
shear..
4. Align hole in blade with hole in the shear
head, and push the blade pin through hole in
blade until feel a detent.
ROTATING/CHANGING THE CUTTER JAWS
The cutting jaws should not be reground.
The cutter jaws and are identical, and can be
interchanged to extend the life.
When the cutting performance is
unsatisfactory, rotate each cutter 180° or
replace.
To rotate,remove allen screws with the wrench
provided and rotate the cutter jaws 180° and
mount them on opposite sides of the shear
head, if both sides of the cutter jaws are
blunt they must be replaced (Fig. 3).
The use of any accessory or attachment other
than recommended in this instruction manual
or the BOSCH Catalog may present a risk of
personal injury.
GENERAL INFORMATION
Following a few simple tips will reduce wear
on the tool and the chance of injury to the
user.
With the tool unplugged from the power
supply and the ON/OFF Switch in the “OFF”
position, become familiar with handling the
shear and learning the location of its parts.
Secure or clamp small workpieces to be cut to
prevent slippage.
Inspect the blades for excessive wear, rotate
or replace if necessary.
Always direct the cord toward the rear, and
away from the shear. Keep it away from
sharp edges.
Never start the shear with the blades in
contact with the material being cut.
Do not exceed recommended capacities for
this shear. Premature blade failure will occur
when the shear is over-gaged.
To extend blade life and prevent corrosion,
occasional light lubrication of the blades is
recommended. Any light weight machine oil
can be used for this purpose.
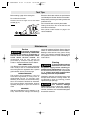
SLIDE ON-OFF SWITCH WITH LOCK
The tool is switched “ON” by the switch
button located at the side of the motor
housing. The switch can be locked in the
“ON” position, a convenience for long cutting
operations.
TO TURN THE TOOL “ON” without locking
it, slide the switch button forward by applying
pressure ONLY at the REAR portion of the
button. When pressure is released the switch
button will snap to “OFF” position.
TO LOCK THE SWITCH “ON”, slide the
switch button forward and press “IN” the
FRONT portion.
TO UNLOCK THE SWITCH, simply press
and release the REAR portion of the button.
Switch is spring loaded and will snap back
automatically.
Start the tool before applying to work and let
the tool come to full speed before contacting
the workpiece. Lift the tool from the work
before releasing the switch. DO NOT turn the
switch “ON” and “OFF” while the tool is
under load; this will greatly decrease the
switch life.
BM 3609929810 11-04 11/15/04 10:40 AM Page 7