


6.
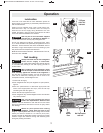
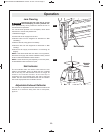
Operation
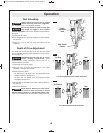
Assembly / Installation
Follow the instructions below to prepare your tool for
operation.
1.All tool operators and their immediate supervisors must
become familiar with the operator safety instructions
before operating the tool. The instructions begin on
page 2 of this manual.
2.Included with each tool are one copy of these
Operating/Safety Instructions. Keep this publication for
future reference.
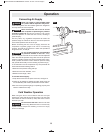
3.Install a filter, regulator, lubricator unit and moisture trap
on your air delivery system per the manufacturer's
instructions for these devices. Additionally, install a
pressure gauge as close as practical to the tool,
preferably within ten feet.
4.Select hoses with a minimum inner diameter of 1/4 inches
and a maximum length of 100 feet.
To reduce the risk of injury from a hose
bursting, select hoses that are rated at
least 200 PSI.
5.Select fittings that are appropriately sized for the selected
hoses. The tool and air hose must have a hose coupling
such that all pressure is removed from the tool when the
coupling joint is disconnected.
Never use non relieving couplers
and/or female quick disconnect
couplings on the tool. Non relieving couplings and
female couplings will trap high pressure air in the tool
when the air line is disconnected. This will leave the tool
charged with enough air after it has been disconnected to
drive a nail. Only MALE pneumatic type air connectors
should be fitted to the tool, so that high pressure air in the
tool is vented to atmosphere as soon as the air line is
disconnected.
6.Set the regulator at the air delivery system to a PSI that
falls within the tool's operating range of 70 to 120 PSI.
The correct pressure is the lowest pressure that will do
the job.
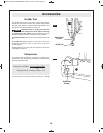
7.If the operator is working at a bench or table, it is
recommended to run the air line underneath the bench. A
small tray under the bench top can hold the nail supply
and the tool when not in use.
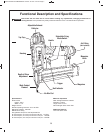
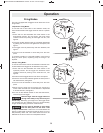
Actuation System
Your tool is equipped with two devices that require actuation
before the tool will fire, the work contact element and the
finger trigger. There are two selectable modes, built into the
trigger, that determine how the tool fires nails.
“Sequential” Firing Mode: In “sequential” firing mode,
there is a predetermined sequence required to fire a nail.
The work contact element must first be depressed against
the work piece. A nail will then fire when the trigger is
depressed. To fire another faster, the work contact element
must be removed from the work piece, the trigger must be
released. The sequence can then be repeated.
“Bump” Firing Mode: In “Bump” firing mode, nails can be
fired each time the work contact element is depressed with
the trigger depressed. With the trigger continuously
depressed, a nail will fire each time the work contact
element is depressed against the work piece. This allows
for nails to be fired at a faster rate.
Each mode is described in detail in the “Firing Modes”
section of this manual.
Understand the differences between
actuation modes for this tool. Using the
tool in an inappropriate mode may cause tool to react in an
unexpected manner and may result in personal injury.
Verify the setting of the Selectable trigger
switch before using the tool. Using the tool
before verifying the actuation mode may cause tool to react
in an unexpected manner and may result in personal injury.
!
WARNING
!
WARNING
!
WARNING
!
WARNING
BM 2610957386 04-09:BM BNS200-18 04-09 6/17/09 7:55 AM Page 6