


Store and transport the tool only in the
supplied protective case.
Keep the tool clean at all times.
Do not immerse the tool into water or
other fluids.
Wipe off debris using a moist and soft cloth.
Do not use any cleaning agents or solvents.
Regularly clean the surfaces at the exit
opening of the laser in particular, and pay
attention to any fluff of fibers.
If the tool should fail despite the care taken in
manufacturing and testing procedures, repair
should be carried out by an authorized after-
sales service center for Bosch power tools.
In all correspondence and spare parts
orders, please always include the 10-digit
article number given on the type plate of
the tool.
In case of repairs, send in the tool packed in
its protective case 16.
ENVIRONMENT PROTECTION
Recycle raw materials & batteries
instead of disposing of waste. The unit,
accessories, packaging & used batteries should
be sorted for environmentally friendly recycling
in accordance with the latest regulations.
Maintenance and Service
-12-
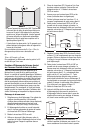
To fasten the tool on the Multiple-Purpose
Attachment 8, screw the locking screw 9 of
the Multiple-Purpose Attachment into the
1/4" tripod mount 6 on the tool and tighten.
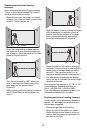
To rotate the tool on the Multiple-Purpose
Attachment, slightly loosen the screw 9.
– Rotate the tool on the Multiple-Purpose
Attachment 8 sideward or toward the rear
to make the bottom plumb beam visible.
– Rotate the tool on the Multiple-Purpose
Attachment 8 to project heights with the
horizontal laser beam.
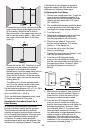
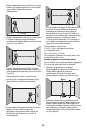
With the Multiple-Purpose Attachment 8, the
tool can be attached as follows:
– Mount the Multiple-Purpose Attachment 8
to a commercially available camera tripod
via the 1/4" tripod mount 13. For fastening
to a commercially available construction
tripod, use the 5/8" tripod mount 14.
– The Multiple-Purpose Attachment 8 can be
fastened to steel parts via the magnets 12.
– The Multiple-Purpose Attachment 8 can be
fastened to drywall or wood walls with
screws. For this, insert screws with a
minimum length of 2 in. into the screw
holes 10 of the Multiple-Purpose
Attachment.
– The Multiple-Purpose Attachment 8 can
also be fastened to pipes or similar beams
using a commercially available strap by
threading it through the opening 11 for
strap attachment.
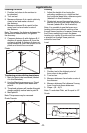
Working with the Tripod (Optional
Accessory)
A tripod 18 offers a stable, height-adjustable
measuring support. Place the tool via the
tripod mount 6 onto the 1/4" male thread of
the tripod and screw the locking screw of the
tripod tight.
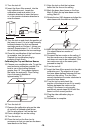
Working with the Measuring Plate
(Optional Accessory)
With the measuring plate 15, it is possible to
project the laser mark onto the floor or the
laser height onto a wall.
With the zero field and the scale, the offset or
drop to the required height can be measured
and projected at another location. This
eliminates the necessity of precisely adjusting
the tool to the height to be projected.
The measuring plate 15 has a reflective
coating that enhances the visibility of the
laser beam at greater distances or in intense
sunlight. The brightness intensification can
be seen only when viewing, parallel to the
laser beam, onto the measuring plate.
Laser Viewing Glasses (Optional
Accessory)
The laser viewing glasses filter out the
ambient light. This makes the red light of the
laser appear brighter for the eyes.
• Do not use the laser viewing glasses as
safety goggles. The laser viewing glasses
are used for improved visualization of the
laser beam, but they do not protect against
laser radiation.
• Do not use the laser viewing glasses as
sun glasses or in traffic. The laser
viewing glasses do not afford complete UV
protection and reduce color perception.
Use with Attachments