


-8-
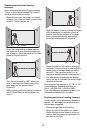
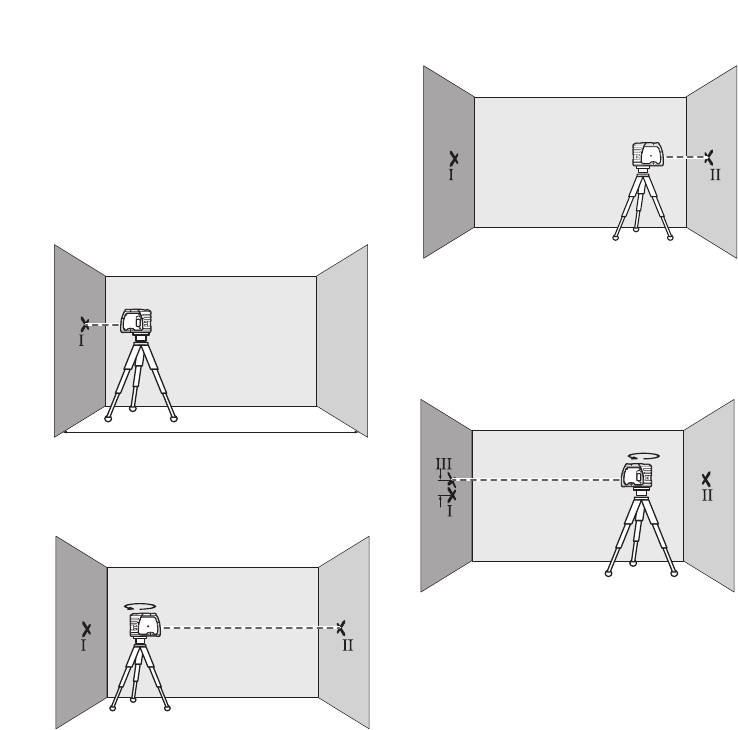
Checking the Horizontal Leveling
Accuracy
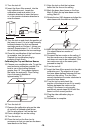
A free measuring distance of approximately
78 ft on a firm surface between two walls A
and B is required for the check.
– Mount the tool onto the holder or a tripod,
or place it on a firm and level surface close
to wall A. Switch the tool on.
– Direct the horizontal laser beam against
the close wall A and allow the measuring
tool to level in. Mark the center of the laser
beam on the wall (point I).
– Turn the tool around by 180°, allow it to
level in and mark the center point of the
laser beam on the opposite wall
B (point II).
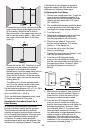
– Without turning the tool, position it close to
wall B. Switch the tool on and allow it to
level in.
– Align the height of the tool (using the tripod
or by underlaying, if required) in such a
manner that the center point of the laser
beam is projected exactly against the
previously marked point II on wall B.
– Rotate the tool by 180° without changing
the height. Allow it to level in and mark the
center point of the laser beam on wall A
(point III). Take care that point III is as
vertical as possible above or below point I.
– The difference d of both marked points I
and III on wall A indicates the actual height
deviation of the tool.
On the measuring distance of 2 x 78 ft = 156
ft, the maximum allowable deviation is:
156 ft x ±0.0036 in/ft = ±9/16 in(.563).
Thus, the difference d between points I and
III should not exceed 9/16 in (max.).
Checking the Vertical Leveling Accuracy
For this check, a free measuring distance of
approx. 13 ft between floor and ceiling on a
firm surface is required.
– Draw a straight line on the ceiling.
– Mount the tool to the holder or a tripod.
Switch the tool on and rotate it in such a
manner that the bottom plumb beam can
be seen on the floor.
A
B
78 ft
A
B
180˚
A
B
d
180˚
A
B