


4)6%8-2+27869'8-327
!
30( 8,) 8330 ;-8, &38,
,%2(7;,-0)78%68-2+8,)
83307-2')83659)*6318,)13836'%2
'%97)8,)8330838;-78
389628330 depress the “Lock-Off”
release button from either side and squeeze
the trigger switch.
389628,)8330 release the trigger
switch and it will return to "OFF" position
automatically.
To increase switch life, do not turn switch on
and off while tool and drum are held against a
workpiece.
Proper planing action helps to achieve the
desired result. With practice and experience, it
will become second nature. Make sure that the
workpiece is held in place securely on your
work surface, and standing comfortably, hold
the planer firmly with both hands.
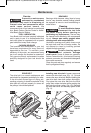
1. With the planer fully adjusted, place the front
shoe on the workpiece, (be certain that the
blade drum is not in contact with the work)
and start the planer as described earlier.
2. With pressure on the front shoe, and the
fence against the side of the work (to control
the width or angle,) feed the planer steadily
until the full length of the rear shoe passes
over the edge of the workpiece. (Fig. 6)
3. Then gradually transfer pressure to the rear
shoe, and continue planing to the end of the
cut.
4. If pressure is not maintained over the rear
shoe through the end of the cut, a divot may
be created in the workpiece once the front
shoe clear the end of the workpiece. To
minimize this possibility, use a 3-way edge
clamp to hold a piece of scrap wood (at
least 1-1/2" (38 mm) thick) on the end of the
workpiece, aligned with the surface to be
planed. Doing this moves the location of a
potential divot off the workpiece and on to
the piece of scrap wood.
5. Feed the planer at a uniform and reasonable
rate that does not put excessive strain on
the motor or blades, (do not pull the planer
back over the surface already cut.)
6. Use progressive cuts until you are near the
desired depth, and then re-adjust to a thin
cut for the final pass to obtain a good
surface finish.
,) 13836 1%= 78%00 -*
-14634)60= 97)( 36
3:)603%()( Reduce the pressure (feed rate)
or depth of cut to prevent possible damage to
the tool if the motor labors.
!
CAUTION
!
WARNING
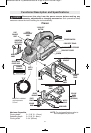
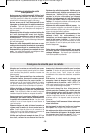
PARK
REST
SHOE
-9-
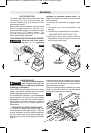
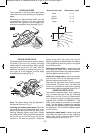
The blade should be centered relative to the
front and rear shoes. (Fig 5.) Rotate the blade
drum by hand to verify sure that the blade
doesn’t touch to any other part of the tool.
Make sure the blade sits correctly in the holder
groove of the cutter drum.
You may then tighten the clamping screws
which secure the blade and your planer is ready
for use.
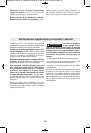
CLAMPING
SCREW
CUTTER
DRUM
2.5 MM
BLADE
WRENCH
FIG. 5
FIG. 6
BM 2610021505 02-12_BM 2610021505 02-12.qxp 9/18/12 2:56 PM Page 9