


6
Troubleshooting Chart
Symptom Possible Cause(s) Corrective Action
1. Switch in OFF position
2. No electrical power at wall outlet
3. Compressor has reached automatic
shutoff pressure
4. Motor overloaded
5. Pressure switch bad
1. Defective check valve
2. Defective unloader valve (on pressure
switch)
3. Low voltage
4. Loose electrical connections
5. Wrong gauge wire or length of
extension cord
6. Defective motor capacitor
7. Shorted or open motor winding
1. Incorrect fuse size, circuit overloaded
2. Wrong gauge wire or length of
extension cord
3. Defective check valve
4. Defective unloader valve (on pressure
switch)
5. Defective motor capacitor
6. Motor shorted or seized
1. Low voltage
2. Wrong gauge wire or length of
extension cord
3. Clogged intake filter
4. Lack of proper ventilation/room
temperature too high
5. Defective check valve
6. Defective unloader valve (on pressure
switch)
7. Compressor valves failed
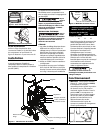
1. Loose mounting bolts
2. Tank not level
3. Cylinder or piston is worn/scored
1. Loose drain valve
2. Check valve leaking
3. Loose connections at fittings, tubing,
etc.
4. Tank leaks
1. Make sure compressor is plugged in and switch is ON.
2. Check circuit breaker or fuse at electrical panel.
3. Release air from tank until compressor restarts
automatically.
4. Allow compressor to cool for approximately 30
minutes then push the motor reset. Make sure
compressor is run in a clean, well-ventilated area.
5. Replace pressure switch.
1. Repair or replace.
2. Repair or replace.
3. Check voltage at wall outlet with voltmeter.
4. Check all electrical connections.
5. Check extension cord chart for proper extension cord
usage.
6. Replace capacitor.
7. Replace motor assembly.
Do not dissassemble
check valve with air in
tank; bleed tank
1. Check for proper fuse. Use time delay fuse.
Disconnect other electrical appliances from circuit or
operate compressor on its own branch circuit.
2. Check extension cord chart for proper extension cord
usage.
3. Repair or replace.
4. Repair or replace.
5. Replace capacitor.
6. Replace motor assembly.
Do not dissassemble
check valve with air in
tank; bleed tank
1. Check voltage at wall outlet with voltmeter.
2. Check extension cord chart for proper extension cord
usage.
3. Clean or replace filter.
4. Move compressor to well-ventilated area.
5. Repair or replace.
6. Repair or replace.
7. Replace valve assembly.
Do not dissassemble
check valve with air in
tank; bleed tank
1. Tighten bolts.
2. Use sturdy wedge/object to bring tank to level position.
3. Replace or repair as necessary.
1. Tighten.
2. Remove check valve. Clean or replace.
3. Check all connections with soap and water solution.
If a leak is detected, (1) tighten or (2) remove fitting
and apply pipe tape to threads and reassemble.
4. Check tank for leaks with soap and water solution. If
leak is detected, tank must be replaced with genuine
replacement part.
Do not dissassemble
check valve with air in
tank; bleed tank
Compressor will not run
Motor hums but cannot
run or runs slowly
Fuse blows/circuit
breaker trips repeatedly
Thermal overload
protector cuts out
repeatedly
Knocks, rattles, and/or
excessive vibration
Tank pressure drops
when compressor shuts
off
www.chpower.com
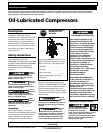
Oil-Lubricated Compressors