


d)The rated speed of the
accessory must be at least
equal to the maximum speed
marked on the power tool.
Accessories running faster than
their rated speed can fly apart.
e)The outside diameter and the
thickness of your accessory
must be within the capacity
rating of your power tool.
Incorrectly sized accessories
cannot be adequately guarded
or controlled.
f)The arbour size of wheels,
flanges, backing pads or any
other accessory must
properly fit the spindle of the
power tool. Accessories with
arbour holes that do not match
the mounting hardware of the
power tool will run out of
balance, vibrate excessively and
may cause loss of control.
g) Do not use a damaged
accessory. Before each use
inspect the accessory such as
abrasive wheels for chips and
cracks, backing pad for cracks,
tear or excess wear, wire brush
for loose or cracked wires. If
power tool or accessory is
dropped, inspect for damage or
install an undamaged
accessory. After inspecting and
installing an accessory, position
yourself and bystanders away
from the plane of the rotating
accessory and run the power
tool at maximum no load speed
for one minute. Damaged
accessories will normally break
apart during this test time.
h)Wear personal protective
equipment. Depending on
application, use face shield,
safety goggles or safety
glasses. As appropriate, wear
dust mask, hearing protection,
gloves and shop apron capable
of stopping small abrasive or
workpiece fragments. The eye
protection must be capable of
stopping flying debris generated
by various operations. The dust
mask or respirator must be capable
of filtrating particles generated by
your operation. Prolonged
exposure to high intensity noise
may cause hearing loss.
i)Keep bystanders a safe
distance away from work
area. Anyone entering the
work area must wear personal
protective equipment.
Fragments of workpiece or of a
broken accessory may fly away
and cause injury beyond
immediate area of operation.
j)Hold power tool by
insulated gripping
surfaces only, when
performing an
operation where the
cutting accessory may contact
hidden wiring or its own cord.
Cutting accessory contacting a
“live” wire may make exposed
metal parts of the power tool
“live” and shock the operator.
k)Never lay the power tool
down until the accessory has
come to a complete stop. The
spinning accessory may grab the
surface and pull the power tool
out of your control.
l)Do not run the power tool
while carrying it at your side.
Accidental contact with the
spinning accessory could snag
your clothing, pulling the
accessory into your body.
m)Regularly clean the power
tool’s air vents. The motor’s
fan will draw the dust inside the
housing and excessive
accumulation of powdered metal
may cause electrical hazards.
n)Do not operate the power
tool near flammable
materials. Sparks could ignite
these materials.
o)Do not use accessories that
require liquid coolants. Using
water or other liquid coolants may
result in electrocution or shock.
7) Kickback and Related Warnings
Kickback is a sudden reaction to a
pinched or snagged rotating wheel,
backing pad, brush or any other
accessory. Pinching or snagging causes
rapid stalling of the rotating accessory
which in turn causes the uncontrolled
power tool to be forced in the
direction opposite of the accessory’s
rotation at the point of the binding.
For example, if an abrasive wheel is
snagged or pinched by the workpiece,
the edge of the wheel that is entering
into the pinch point can dig into the
surface of the material causing the
wheel to climb out or kick out. The
wheel may either jump toward or
away from the operator, depending on
direction of the wheel’s movement at
the point of pinching. Abrasive wheels
may also break under these conditions.
Kickback is the result of power tool
misuse and/or incorrect operating
procedures or conditions and can be
avoided by taking proper precautions
as given below.
a)Maintain a firm grip on the
power tool and position your
body and arm to allow you to
resist kickback forces. Always
use auxiliary handle, if
provided, for maximum
control over kickback or
torque reaction during start-
up. The operator can control
torque reactions or kickback
forces, if proper precautions are
taken.
b)Never place your hand near
the rotating accessory.
Accessory may kickback over
your hand.
c) Do not position your body in
the area where power tool will
move if kickback occurs.
Kickback will propel the tool in
direction opposite to the wheel’s
movement at the point of snagging.
d)Use special care when
working corners, sharp edges
etc. Avoid bouncing and
snagging the accessory.
Corners, sharp edges or
bouncing have a tendency to
snag the rotating accessory and
cause loss of control or kickback.
e)Do not attach a saw chain
woodcarving blade or
toothed saw blade. Such
blades create frequent kickback
and loss of control.
5
DG472500DI
General Power Tool
Safety Warnings
(Continued)
32 Sp
Manual de Instrucciones
aspiradora deben cambiarse con
frecuencia.
2) Los paños cobertores de plástico
deben juntarse y desecharse con
todos los restos de polvo y demás
residuos. Deben colocarse en
receptáculos sellados para basura
y desecharse mediante los
procedimientos de recolección de
basura normales. Durante la limpieza,
los niños y las mujeres embarazadas
deben mantenerse alejados del área
inmediata de trabajo.
3) Todos los juguetes, muebles lavables
y utensilios que usen los niños deben
lavarse muy bien antes de volver a
usarlos.
Ensamblaje
Instalación del mango lateral
(auxiliar)
El mango lateral o auxiliar viene
desensamblado con la herramienta y
debe instalarse para proporcionar un
control óptimo y para evitar lesiones
graves. Este mango se puede instalar
tanto en el lado izquierdo como en el
derecho de la herramienta, lo que
prefiera el usuario. Para instalar el
mango lateral, atornille la rosca del
mango lateral hacia la derecha dentro
del orificio roscado de la caja de
engranajes de metal, en el lado que el
usuario prefiera. Asegúrese de que el
mango lateral esté ajustado con
seguridad cuando haya terminado.
Ajuste de la protección de metal
Esta herramienta viene equipada con
una protección de metal ya instalada.
En el caso de que se afloje, la misma se
debe ajustar por medio de los pasos
siguientes:
1.Retire la batería de la herramienta.
2.Use la llave hexagonal de 4 mm que
se proporciona, apriete totalmente
el perno de ajuste de la protección,
asegurándose de que la protección
esté entre el operador y el disco de
trabajo (vástago).
Esta protección de metal también se
puede ajustar ya sea para proteger
mejor al operador o para desviar los
fragmentos de corte/rectificado y las
chispas a un ángulo diferente. Es
imperativo que no se quite nunca la
protección y además que se posicione de
forma tal que siempre esté entre el
operador y el disco de trabajo de modo
que las lascas o trozos del disco que
puedan romperse y salir despedidos
sean desviados lejos del operador. Para
ajustar esta protección de metal siga los
pasos que se describen a continuación.
1. Retire la batería de la herramienta.
2. Usando la llave hexagonal de 4 mm que
se proporciona, afloje el perno de ajuste
de la protección.
3. Vuelva a colocar la protección de
metal según lo desee y apriete
totalmente el perno de ajuste de la
protección.
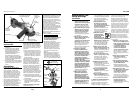
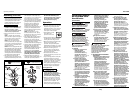
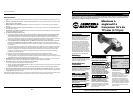
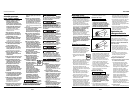
Instalación del disco de trabajo
(Vea las figuras 4 y 5.)
Esta herramienta viene con discos de
corte/rectificado que deben ser instalados
por el usuario. El usuario debe primero
seleccionar el disco adecuado para el
trabajo que va a realizar. Los discos de
corte generalmente son más finos que los
discos de rectificado y se usan
principalmente para cortar objetos de
acero como clavos, pernos, cercas, rieles,
etc. Las ruedas de rectificado
generalmente son más gruesas y se usan
para aplicaciones tales como desbastado,
alisado de soldaduras y similares. Una vez
elegido el disco adecuado para el
trabajo, se pueden seguir los pasos
siguientes para instalar adecuadamente
el disco de trabajo.
1.Retire la batería de la herramienta.
No quitar la batería de la
herramienta puede hacer que ésta
se encienda accidentalmente
causando lesiones graves.
2. Dé vuelta la herramienta y
manteniendo presionado el botón de
bloqueo del vástago negro que se
encuentra en la caja de engranajes,
desatornille la tuerca de sujeción
girándola hacia la izquierda. Use la
llave que se proporciona si fuera
necesario. No quite los rebordes del
disco que son los rebordes más
internos.
3. Asegúrese de que el reborde más
interno (del disco) esté ubicado
adecuadamente en el vástago de la
herramienta. Si está posicionado en
forma adecuada, debería haber muy
poco o ningún movimiento de lado a
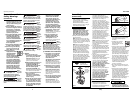
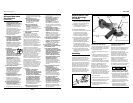
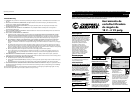
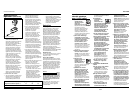
Mango lateral
Mecanismo
de liberación
de la batería
Caja de
engranajes
Botón de
bloqueo del
vástago
Interruptor de ON - OFF
(encendido/apagado)
Batería
Perno
de ajuste
de la
protección
Disco de trabajo
4 1/2 pulg. (115 mm)
Protección
Figura 3
Rueda
abrasiva
Reborde
del disco
Tuerca
de
sujeción
Vástago
Llave
Para ajustar
Para aflojar
Protección
Figura 4
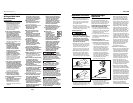
Tuerca de sujeción
enroscada de
modo incorrecto
Ensamblaje
(Continuación)