


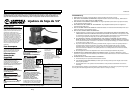


Manual de Instrucciones y Lista de Piezas
14 Sp
Informaciones
Generales de
Seguridad (Continuación)
soporte y equilibrio adecuados
permiten un mejor control de la
herramienta en situaciones
inesperadas.
4. Trabaje siempre en
un área bien ventilada.
Use gafas de seguridad
y una máscara para
polvo aprobada por
OSHA.
5. Mantenga las manos alejadas
de laspiezas giratorias.
6. Use sujetadores u otra manera
práctica de asegurar la pieza de
trabajo a una plataforma estable.
Nunca sostenga el trabajo en sus
manos, su regazo o contra otras
partes de su cuerpo cuando corte.
CUIDADO Y USO DE LA
HERRAMIENTA
No use la herramienta si el interruptor
no la enciende ni apaga. Cualquier
herramienta que no pueda ser
controlada con el interruptor es
peligrosa y debe repararse.
1. Esta herramienta NO debe
modificarse ni usarse para cualquier
aplicación que no sea la aplicación
para la cual fue diseñada.
No fuerce la herramienta. Use la
herramienta correcta para su
aplicación. La herramienta correcta
hará el trabajo mejor y en forma más
segura a la velocidad para la cual fue
diseñada.
2. Cuide sus herramientas.
3. Verifique que no haya partes mal
alineadas, atascadas o rotas, o
cualquier otra condición que pueda
afectar el funcionamiento de la
herramienta. Si la herramienta
presentara un daño, hágala reparar
antes de usarla. Las herramientas
con mantenimiento inadecuado
causan muchos accidentes.
4. Use solamente accesorios
recomendados por el fabricante de
su modelo. Los accesorios apropiados
para una herramienta pueden causar
un riesgo de lesión cuando se usan
con otra herramienta.
5. Algunas maderas contienen
conservadores que pueden ser
!
PRECAUCION
!
ADVERTENCIA
tóxicos. Tenga especial
cuidado para evitar la
inhalación y el contacto
con la piel con estos
materiales. Solicite y
cumpla con toda la información de
seguridad disponible por parte de
su proveedor de materiales.
6. Guarde las herramientas fuera del
alcance de los niños y de otras
personas no capacitadas para
usarlas. Las herramientas son
peligrosas cuando están en manos
de usuarios inexpertos.
Ensamblaje
Asegúrese de que la herramienta no
esté conectada a una fuente de
corriente, luego coloque la herramienta
dada vuelta sobre el banco.
NOTA: utilice sólo almohadillas para
lijar del mismo tipo, tamaño y peso.
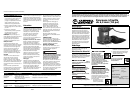
Siga estos pasos para conectar la bolsa
de recolección de polvo al accesorio de
conexión de la bolsa en la manguera
corrugada:
a. Asegúrese de que la bolsa no esté
al revés.
b.Deslice la bolsa de recolección por
la manguera de la aspiradora con
el soporte de la bolsa.
c. Tire del elástico de la bolsa hacia la
manguera de la aspiradora.
Asegúrese de que el elástico esté
colocado en la muesca de plástico.
Esto asegura un calce más justo y
un menor riesgo de que la bolsa se
resbale.
d.Conecte la manguera al puerto para
polvo de la lijadora. Presione el
tubo por completo en la abertura.
Pre-Funcionamiento
ANTES DE ENCENDER LA
HERRAMIENTA:
1.Use siempre protectores auditivos
y máscara contra el polvo.
2.Use gafas de seguridad, en especial
cuando lije por encima de su cabeza.
3.La lijadora no es apta para lijar en
húmedo.
4.Asegúrese de que el interruptor de
encendido no esté en la posición
“ON” antes de enchufar el cable de
corriente.
5.Mantenga el cable de corriente
alejado de las piezas móviles de las
herramientas.
TENGA EN CUENTA ANTES DEL
FUNCIONAMIENTO:
1.ELECCIÓN DEL PAPEL DE LIJA
El papel de lija grueso (grano 50) quita
el material en general y el papel de lija
fino se usa para las terminaciones. Si la
superficie no está pareja, comience con
papel de lija grueso y lije hasta que la
superficie esté pareja.
Utilice papel de lija medio (grano 80)
para quitar los rayones que dejó el
papel de lija grueso.
Use papel de lija fino (grano 120) para
alisar y dar la terminación. Continúe
lijando hasta que la superficie esté lisa.
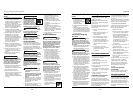
2.INSTALACIÓN DEL PAPEL DE LIJA.
Asegúrese de que el papel de lija sea
del tamaño y tipo correctos para la
almohadilla de lijado a usar.
a.Desenchufe la herramienta.
b.Abra la abrazadera trasera
presionando hacia arriba el
interbloqueo.
c. Instale el papel de lija bajo la
abrazadera. Asegúrese de que el
papel quede en el medio de la
almohadilla. Las perforaciones en
el papel deben corresponderse
con las de la base, para que el
polvo pueda salir correctamente.
d.Coloque el resorte de sujeción de
nuevo en su posición original.
e.Repita la operación para fijar el
papel de lija en el frente.
f. Verifique que las perforaciones en
el papel de lija se correspondan
con los orificios de salida.
g.Fije el papel de lija lo más
ajustado que sea posible.
Quite el recubrimiento de la parte
trasera del papel de lija (si usa papel
recubierto con adhesivo sensible a la
presión [PSA]).
Alinee el papel con la almohadilla de
lijado y luego presione con firmeza
toda la superficie de la almohadilla.
ASPIRADO DEL POLVO
La bolsa de recolección del polvo
recoge el polvo a través de los orificios
en el papel de lija.
CONSIDER BEFORE OPERATING:
1.CHOICE OF SANDPAPER
Coarse sandpaper (grain 50) removes
general material and fine sandpaper is
used for the finishing. If the surface is
not even, then start with rough
sandpaper and sand until the surface is
even.
Use semi-coarse sandpaper (grain 80)
to remove scratches left behind by
coarse sandpaper.
Use fine sandpaper (grain 120) for
smoothing and finishing. Continue
sanding until the surface is smooth.
2.INSTALLING SANDPAPER.
Ensure sandpaper is the correct size
and type for the sanding pad used.
a.Unplug the tool.
b.Open the back clamp by pressing
up the inter-locking.
c. Install the sandpaper under the
clamp. Make sure the paper is in
the middle of the pad. The
perforations in the paper have to
correspond with those on the sand
sole, so that the dust can be
exhausted correctly.
d.Put the clamping spring back into
the original position.
e.Repeat the operation to fix the
sandpaper in the front.
f. Check the perforations in the
sandpaper correspond with the
exhaust gaps.
g.Fix the sand-paper as tight as
possible.
Peel release liner from back of
sandpaper (if using pressure sensitive
adhesive (PSA) backed paper).
Align paper over sanding pad then
press firmly over entire surface of
sanding pad.
VACCUUM DUST COLLECTION
The dust collection bag picks up
sawdust through holes in the
sandpaper.
3
General Safety (Cont’d.)
5. Some wood contains
preservatives which can
be toxic. Take extra care
to prevent inhalation
and skin contact when
working with these materials.
Request and follow all safety
information available from your
material supplier.
6. Store tools out of reach of children
and other untrained persons. Tools
are dangerous in the hands of
untrained users.
Assembly
Ensure tool is not connected to a
power supply then place tool upside
down on workbench.
NOTE: Use only sanding pads of the
same type, size and weight.
Follow these steps to attach dust
collection bag to bag fitting on
corrugated hose:
a. Make sure bag is not inside out.
b.Slide collection bag over vacuum
hose with bag support.
c. Pull elastic of bag towards the
vacuum hose. Make sure elastic is
placed in the indintation of plastic.
This ensures a tight fit and lower
risk of bag slippage.
d. Attach hose to dust port in sander.
Press tube completely over
opening.
Pre-Operation
BEFORE OPERATING THE TOOL:
1.Always wear ear protectors and dust
mask.
2.Use safety glasses, especially when
you sand above your head.
3.The sander is not suitable for wet
sanding.
4.Check that power switch is not in
the “on” position before you plug in
the power cord.
5.Keep the power cord away from
moving parts of the tools.
Operation
Orbital sanders are designed so the
palm of one hand can guide tool
during sanding.
For additional dust collection, a central
vacuum or stand alone vacuum unit
may be connected to the corrugated
vacuum hose in place of the dust
collection bag.
1. Begin sanding process by selecting
the finest grit suitable for the initial
sanding pass. The grit should be
coarse enough to remove burrs and
excessive roughness.
2. Change sandpaper to a grit one to
two ranges finer.
3. Continue process by changing to
successively finer grits until desired
finish is obtained.
NOTE: Do not change from coarse grit
to very fine grit sandpaper in one step.
Swirl marks that might have been
made with the coarse grit will be
difficult to remove.
SANDING FLAT
The sand sole of your sanding machine,
executes small circular movements.
Through this you will get an even
surface without signs. Since a circular
movement is executed, it is not very
important how to hold and move your
sanding machine. It is rarely necessary
to bring extra pressure to the machine .
FINISHING
Check whether the existing surface is in
bad condition, before you remove
paint or varnish on doors, windows,
and so on. ‘’Bad condition”refers to the
upper coat is loose or peels off and
much that it can be removed easily
with a brush or scraper.
Sand the surface flat, eliminating all
spots and making it dull enough before
the new coat of paint or varnish is
applied.
First use rough sandpaper to polish the
hard surface of the old coat. Then use a
finer sandpaper for preparing the
surface for the new coat of paint or
varnish.
www.chpower.com
DG480100CK