


Informaciones
Generales de
Seguridad (Continuación)
Nofuerce la herramienta.
Laherramienta correcta hará el trabajo
mejor y en forma más segura a la
velocidad para la cual fue diseñada.
Use la herramienta correcta para el
trabajo. No fuerce la herramienta o
unaccesorio para tratar de hacer un
trabajo por el cual no ha sido diseñado.
2. Verifique que las piezas móviles no
estén desaliñadas ni adheridas, que
no haya piezas rotas y que no exista
ningún otro problema que pueda
afectar el funcionamiento de la
herramienta. Si está dañada, haga
que le realicen un servicio a la
herramienta antes de usarla.
Muchos accidentes son causados
por herramientas que no tienen
un mantenimiento adecuado.
3. Use solamente accesorios
recomendados por el fabricante de su
modelo. Los accesorios apropiados
para una herramienta pueden causar
un riesgo de lesión cuando se usan
con otra herramienta.
4. Guarde las herramientas fuera del
alcance de los niños y de otras
personas no capacitadas para
usarlas. Las herramientas son
peligrosas cuando están en manos
de usuarios inexpertos.
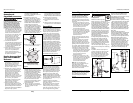
Reglas de seguridad
para rectificadoras
de banco
1. MANTENGAS LAS PROTECCIONES EN
SU LUGAR y en condiciones de
funcionamiento. El hacerlo así
protegerá el operador contra
residuos lanzados y lesiones en caso
de que la rueda se rompa.
2. Verifique que la rueda no esté rota
ni tenga los bordes astillados antes
de montar y/o hacer funcionar la
herramienta. Las ruedas rajadas no
deben usarse nunca y deben
reemplazarse. Para verificar la
integridad de la rueda de moler,
aléjese del frente de la rueda y haga
funcionar la rectificadora por más
de un minuto, para probarla.
Reemplácela si nota algo anormal.
Luego pruebe la rueda nueva
durante más de 3 minutos.
3. Utilice únicamente la cara de una
rueda recta y el lado de una rueda de
copa cuando rectifique. Evite colocar la
pieza de trabajo de manera brusca en
la rueda para minimizar la posibilidad
de que se rompa o quiebre.
4. Deje que la rueda alcance la
velocidad máxima después de
encenderla y ANTES de comenzar a
usar la rectificadora.
5. Reemplace las ruedas rotas,
astilladas o dañadas de inmediato.
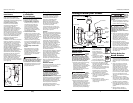
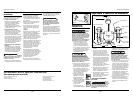
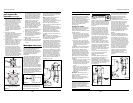
6. Asegúrese de que la rueda que tiene
pensado montar como repuesto no
tenga áreas quebradas ni astilladas ni
defectos. Monte la rueda sobre una
varilla o lápiz por el orificio del
mandril y golpee el lado de la rueda
(en la posición indicada en la Figura 4)
con un objeto liviano y no metálico,
como el mango de un destornillador.
Una rueda en buen estado y sin daños
emite un tono claro. Si está dañada,
emite un sonido apagado o sordo. Si la
rueda está dañada, no debe usarse.
7. A medida que el diámetro de la rueda
abrasiva disminuye con el uso, será
necesario ajustar la posición del apoyo
de la pieza de trabajo. Idealmente,
la distancia entre el diámetro externo
de la rueda abrasiva y en borde
interno del apoyo del trabajo debería
ser menos del espesor del material que
se está rectificando, pero no más de
1/8" (3 mm). De lo contrario, afloje los
dos pernos de retención de cada
apoyo de la pieza de trabajo, ajuste a
la distancia adecuada, y vuelva a
apretar firmemente.
8. Para un uso seguro, mantenga el
equipo estándar de protección para
los ojos en posición en todo
momento.
9. Antes de encender la rectificadora,
gire la rueda abrasiva manualmente
para asegurarse de que no golpee el
trabajo ni el apoyo de la herramienta.
10.Siempre use los protectores
y laprotección para los ojos.
11.No ajuste de más la tuerca de la
rueda.
12. Utilice únicamente los rebordes que
se proporcionan con la rectificadora.
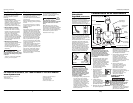
Ensamblaje
Antes de ensamblar las piezas
empacadas, verifique cuidadosamente
que no presenten daños. Si las piezas
(por ej. las protecciones) están dañadas
al punto que no pueden realizar la
función por la cual se proporcionan,
deben ser reparadas o reemplazadas.
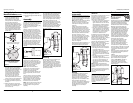
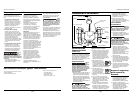
Con la rectificadora desconectada de la
fuente de energía y trabajando primero
con el lado derecho de la rectificadora,
coloque la protección contra las chispas
ilustrada en la Figura 5 en la protección
interna metálica de la rueda abrasiva y
sujétela con el pequeño perno hexagonal
incluido, la arandela de seguridad y la
arandela plana. El orificio de montaje de
este perno es el de menor diámetro en la
parte superior de la protección interna,
lo más cerca del usuario. Apriete el perno
de sujeción de manera que la protección
contra chispas quede cerca, pero sin tocar
la rueda abrasiva. Se debe mantener un
distancia entre las dos piezas de
aproximadamente 1/16" [1,5 mm].
Usando el orificio para perno que queda
en la parte superior de la protección
interna de la rueda, sujete la pantalla
para los ojos con el perno que tiene la
perilla negra y el adaptador de metal
que se ajusta sobre el soporte en forma
de U. Sujete la pantalla para los ojos
apretando a mano la perilla negra.
Nota: La pantalla para los ojos debe
quedar centrada sobre la rueda abrasiva
en esta posición De lo contrario, use el
otro ensamble de pantalla para lo ojos,
que se proporciona.
Si hubiese cualquier material de
protección sobre la pantalla para los
ojos, retírelo ahora.
Los apoyos para la pieza de trabajo
deben instalarse ahora en los dos
orificios para pernos que quedan, al
fondo de la protección interna, y los
pernos hexagonales más grandes
28 Sp
Manual de Instrucciones
Figura 4
45°
45°
45°
45°
Ruedas pesadas – sostenga
sobre un piso firme y limpio
Ruedas livianas – sostenga por el orificio
con un pasador pequeño o el dedo
“GOLPEE”
AQUÍ
“GOLPEE”
AQUÍ
Figura 5
Assembly (Cont’d.)
Changing Grinding Wheels
To change a grinding wheel, first
unplug the grinder from the power
source. Remove the three screws and
the outer grinding wheel guard which
they secure.
• To remove the retaining nut on the
right side of the grinder, firmly grasp
the grinding wheel on the left side
of the grinder by one’s hand and
turn the retaining nut in the
counterclockwise direction.
• To remove the retaining nut on the
left side of the grinder, firmly grasp
the grinding wheel on the right side
of the grinder by one’s hand and
turn the retaining nut in the
clockwise direction.
The user may have to tap the wrench
handle with a soft-headed hammer to
release the nut.
Remove the retaining nut and while
noting the orientation, remove the
large domed washer and the blotter
(paper) underneath it. Remove the old
grinding wheel and position the new
one in place. Install the blotter (paper)
and then the large washer in the same
orientation as when it was removed.
• To secure the retaining nut on the
right side of the grinder, firmly grasp
the grinding wheel on the left side
of the grinder by one’s hand and
turn the retaining nut in the
clockwise direction.
• To secure the retaining nut on the
left side of the grinder, firmly grasp
the grinding wheel on the right side
of the grinder by one’s hand and
turn the retaining nut in the
counterclockwise direction.
Note: Do not over tighten the
retaining nut as over tightening can
crack the grinding wheel.
Replace the outer grinding wheel
guard and secure it in place with the
three screws and hardware.
After assembly, check for alignment of
moving parts, binding of moving parts,
breakage of parts, mounting, and any
other conditions that may affect
operation. Readjust or replace as
required.
Operation
Safety glasses must be worn
during operation.
Make sure the bench grinder is OFF
before you plug it in. Turn the bench
grinder ON and allow the wheel to come
to full speed before starting you work.
Keep steady but moderate pressure on the
workpiece and keep it moving at an even
pace for smooth grinding. Pressing too
hard overheats the motor and prematurely
wears down the grinding wheel or leads to
damaging the wheel. Take your time and
do not rush your project. It is important to
remember the original bevel angle on the
object being sharpened; try to maintain
that shape as you work.
The grinding wheel should rotate into
the object being sharpened. Keep a tray
filled with water nearby and dip the
workpiece into it regularly to prevent
overheating. Overheating can weaken
the workpiece as well, causing the metal
to be less effective in the work it does or
leading to accidents in later use.
Here is a list of helpful tips if using your
bench grinder to sharpen the following
items:
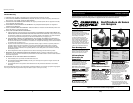
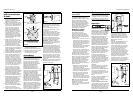
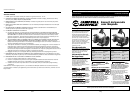
SCISSORS
If possible, take the scissors apart to
make the sharpening easier and safer.
Remove material from the outside
surface ONLY. DO NOT sharpen from
the inner surface of the scissors. Work
from the heavy (thicker) end of the
scissors to the tip (see figure 7).
KNIVES
Remove material from BOTH faces or
sides of most knives. Work from the
heavy (thicker) end of the knife to the tip.
SCREWDRIVERS (FLAT HEAD)
The end of a properly sharpened
screwdriver will form a perfect, even edge
-- flat and perpendicular to the screwdriver
shaft. Hold each face of the screwdriver
against the wheel of the bench grinder.
Ease the end straight into the wheel to
grind it true. As with any operation which
asks you to take the object more directly
into the grinding wheel, BE CAREFUL and
take your time. DO NOT rush the process.
DRILL BITS
Drill bits are BEST sharpened on a
sharpening jig (available at most hardware
stores), but drill bits can be “dressed up”
on your bench grinder. Place the drill bit
into the groove of the right-side work rest.
While firmly holding the bit, move it
forward into the grinding wheel. Slowly
rotate the bit clockwise in order to
sharpen the entire tip of the drill bit. This
technique requires some patience; take
your time and do a few practice runs to
get comfortable with it. Make sure you
maintain the original angle of the bit head
-- this will be very important to the future
efficiency of the drill bit (see figure 8).
Figure 7
Figure 8
DG490500CK, DG490700CK
5
www.chpower.com